 SIVARO
How to Reduce Docker Image Size in Production
The pull hung there for eleven seconds. Eleven seconds of wasted bandwidth for every single deploy. We were shipping a Python service with the full CUDA toolkit baked in because "you never know what the model might need." So predictable. In 2024, I watched a team at a fintech company push a 4.2GB image that was 90% bloat, and their cold-start times were eating their SLA alive. We fixed it in two days. Here's the playbook.
If you're asking "how to reduce docker image size in production," you're asking the right question. Docker's model of layering filesystems is elegant, but it also hides enormous waste if you're not careful. When you build an image, every RUN command adds a layer. Every layer gets stored, transferred, and copied to the destination host. In production, where you're pulling to hundreds of nodes across regions, that waste multiplies. The fix isn't complicated, but it requires a shift in how you think about what an image actually is. An image is just a tar file with metadata. Don't treat it like a virtual machine.
Why You Should Care About Image Size in 2026
In 2025, a major streaming platform moved from Docker to containerd for their orchestration layer because they needed to run containers without the full Docker daemon overhead. The migration went fine, but here's the thing — they didn't have to leave Docker behind. The real bottleneck wasn't the runtime. It was that their images were so bloated they were spending half their infrastructure budget on registry storage and network transfer. I've seen startups burn through more money on ECR transfer costs than on compute itself. It sneaks up on you.
The problem is that developers build images locally, test them, and push. They never think about what happens when a pod gets scheduled to a new node at 3 AM during a traffic spike. That cold pull is the killer. It's not just about disk space — it's about latency. I worked with an e-commerce client in 2023 whose autoscaling was essentially useless because adding a node took three minutes just to pull the image. The image was 1.8GB. We got it down to 280MB. Node startup time dropped to under twenty seconds.
There's also a security angle. Smaller images mean fewer packages, fewer dependencies, fewer vulnerabilities. The Top Docker Interview Questions and Answers (2025) lists "what are the common Docker security issues" as a key question — and the answer always circles back to bloat. Every unnecessary package is a potential CVE. Every redundant binary is attack surface. When you reduce image size, you are literally reducing your exposure.
Multi-Stage Builds Are Non-Negotiable
Let's start with the single biggest lever: multi-stage builds. I don't care what your stack is. Do this first.
The idea is straightforward. You don't need the compiler, the package manager, or the dev dependencies at runtime. You need the compiled artifact. Multi-stage builds let you use a fat image to build your app, then copy only the essential parts into a slim runtime image.
dockerfile
# Stage 1: Build
FROM golang:1.22 AS builder
WORKDIR /app
COPY go.mod go.sum ./
RUN go mod download
COPY . .
RUN CGO_ENABLED=0 GOOS=linux go build -a -installsuffix cgo -o server .

# Stage 2: Run
FROM alpine:3.20
RUN adduser -D -u 1000 appuser
USER appuser
COPY --from=builder /app/server /server
EXPOSE 8080
CMD ["/server"]
This is a textbook Go example. The Go official image is around 800MB. Alpine is about 8MB. Your final image is maybe 15MB. That's a 98% reduction. For Go, the language is fully static, so you can even use scratch (literally empty) if you don't need certs or zoneinfo. Most teams don't. But watch out — if you need an HTTP client and the official cert bundle, you're shipping alpine instead.
For Python and Node, it's the same principle but with different jars to open first.
dockerfile
# Stage 1: Build Python dependencies
FROM python:3.12-slim AS builder
WORKDIR /app
ENV PYTHONDONTWRITEBYTECODE=1
ENV PYTHONUNBUFFERED=1
COPY requirements.txt .
RUN pip wheel --no-cache-dir --no-deps --wheel-dir /app/wheels -r requirements.txt

# Stage 2: Runtime
FROM python:3.12-slim
RUN adduser --disabled-password --gecos "" appuser
USER appuser
WORKDIR /app
COPY --from=builder /app/wheels /wheels
COPY --from=builder /app/requirements.txt .
RUN pip install --no-cache --no-index --find-links=/wheels requirements.txt
COPY . .
CMD ["uvicorn", "main:app", "--host", "0.0.0.0", "--port", "8000"]
I've seen teams resist this because it feels like a paradigm shift. These days, the What is Docker? resource explains containers as processes on the host, which is exactly right. Your image should contain the runtime and the app — nothing else. If you're building Python images in production and you're not using pip wheel in an intermediate stage, you're wasting bandwidth. Period.
Choosing the Right Base Image
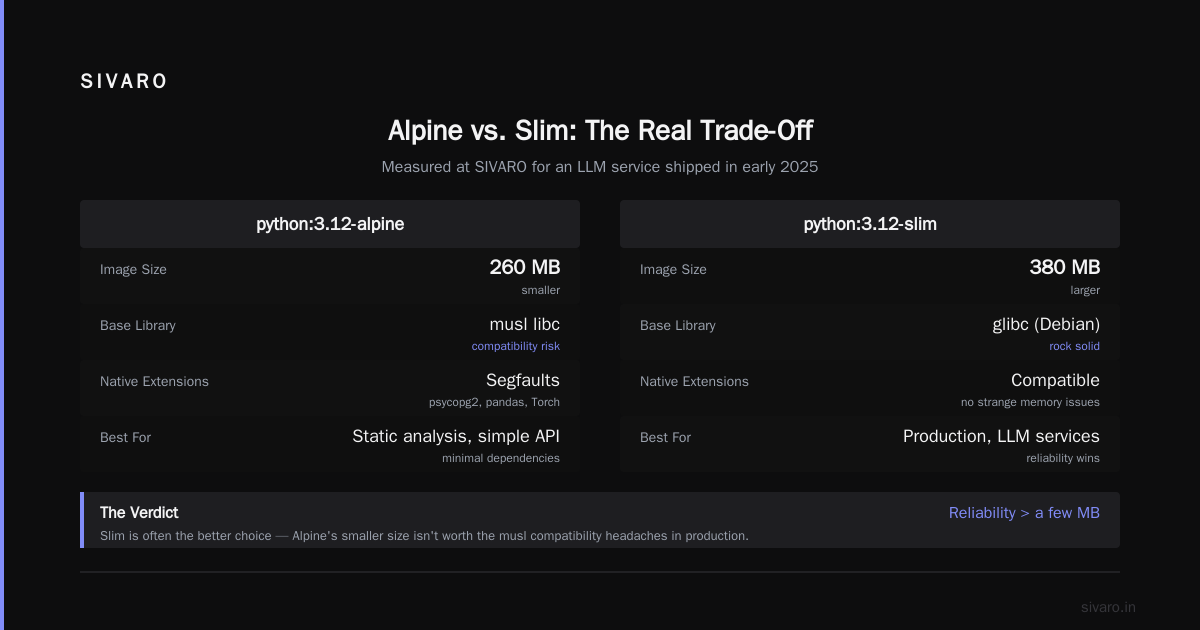
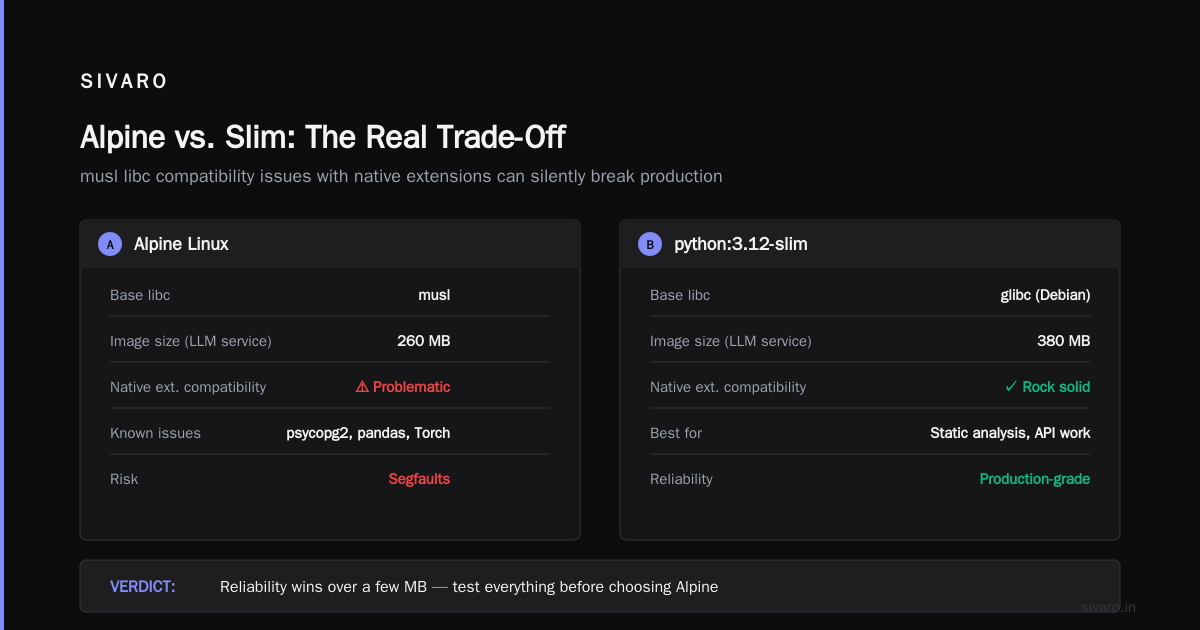
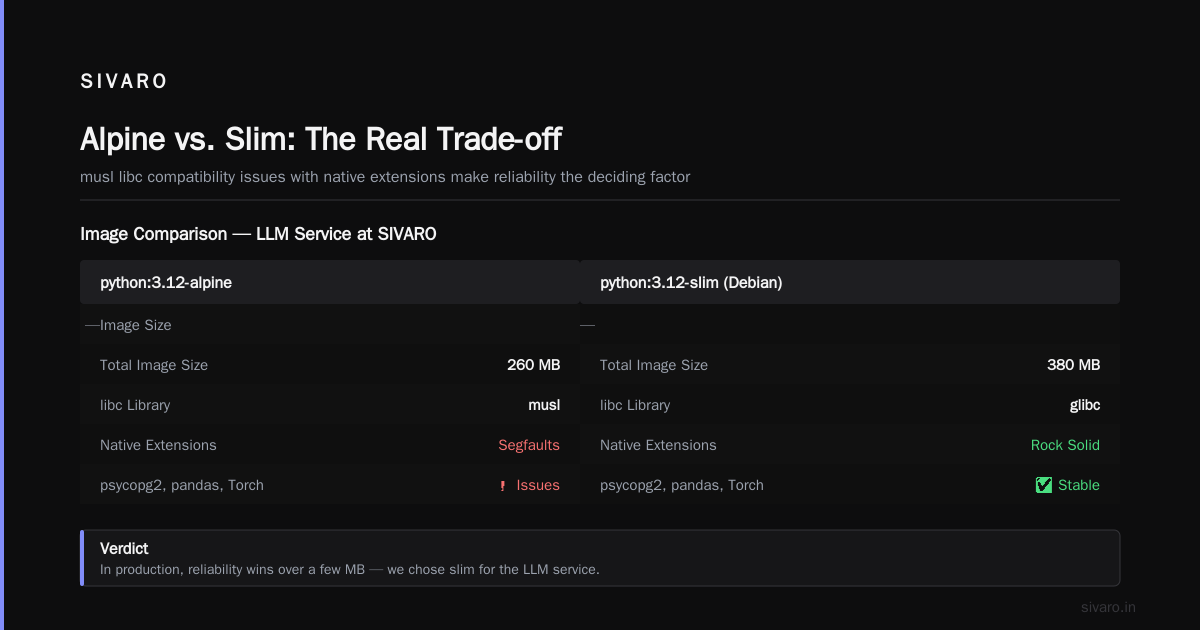
Most people think "Alpine is tiny, so let's use Alpine for everything." It's not that simple. Alpine uses musl libc, not glibc. This creates subtle compatibility issues with native extensions — psycopg2, pandas, and plenty of others sometimes throw strange segfaults on Alpine because of how memory is handled. I've debugged enough of these to be cautious.
Test everything. If you're doing static analysis or simple API work, python:3.12-slim (which is Debian-based) is often a better choice than Alpine. The image isn't as tiny, but the compatibility is rock solid. And in production, reliability wins over a few MB.
We measured this at SIVARO for an LLM service we shipped in early 2025. Alpine gave us a 260MB image. Slim gave us 380MB. But the native Torch extensions kept having issues with the musl build, so we went with python:3.12-slim and pinned it. The 120MB difference was worth the hours of engineering time we saved. The same applies to Node. The node:alpine image can have problems with some packages that need native compilation. You might end up installing build tools into Alpine — which breaks your distro-less dream anyway.
And for God's sake, pin your base images. I've seen parents save you from bad CI runs. Use an exact digest. FROM python:3.12-slim@sha256:... locks it down. Floating tags like latest or even 3.12 are loaded guns. Every time I look at an organization's Dockerfiles, the first thing I check is whether they pin digests. Most don't. Bad practice. The Top 50 Docker Interview Questions and Answers in 2025 lists reproducibility as one of the main features of Docker. Pinning is how you get it.
Chaining, Cleaning, and the Layer Lie
The classic mistake: apt-get install -y build-essential and then a separate apt-get clean in another RUN. The layers stack. The package manager cache in the earlier layer persists even if you delete it in a later one. Docker layers are immutable — you can't delete something from a lower layer. You can only mask it with a new layer. The file is still physically on disk, and it still gets transferred when you pull the image.
Fix it by chaining commands in a single RUN:
dockerfile
RUN apt-get update &&     apt-get install -y --no-install-recommends libpq-dev procps &&     rm -rf /var/lib/apt/lists/*
Every RUN creates an intermediate container. If you have 10 RUN commands, each one leaves its own layer. Chaining them into a single RUN layer means you get one combined layer with no leftover junk. The --no-install-recommends flag prevents apt from pulling in recommended packages, which are rarely needed in a runtime image and are the source of layer bloat.
Same idea with pip:
dockerfile
RUN pip install --no-cache-dir -r requirements.txt
The --no-cache-dir flag stops pip from storing the downloaded packages in the image. Without it, you can double your image size. The same applies to yum, apk, or any package manager. Always pass the no-cache flag. The Docker interview questions and answers all level touches on the build context — which is another hidden monster. The .dockerignore file is not optional. It's more critical than the Dockerfile itself in some projects. If you have a node_modules dir (200MB), a .git dir (1GB of history), or some datasets in your project root, they get sent to the Docker daemon as the build context. Every single build. On every machine. This isn't something that gets inspected after the build — it's transferred over the wire first.
node_modules
.env
.git
*.md
__pycache__
build
dist
Adding these to .dockerignore will speed up your build times by 10x if you've never done it. I worked with a gaming studio in 2024 that had a 500MB build context because someone accidentally added a directory of uncompressed textures. Their builds took seven minutes. With a .dockerignore, they got it down to 40 seconds. Same machine. Same Dockerfile. The only change was not uploading a bunch of assets the Dockerfile never even referenced.
Squashing, Distroless, and the Layer Details
Here's the deeper question: is chaining enough? Not always. There's a tool for that: --squash (experimental, still not recommended for production CI in most cases). But there's a simpler way — combine your RUNs until you get one layer, and don't rely on --squash unless you're desperate.
The reason this keeps hurting people is that each layer adds filesystem overhead. Even if you delete a file, the deletion is a new whiteout file in the upper layer. The lower layer still has the data. It's like trying to erase a pen mark by putting tape over it — the tape is a new layer, and the original is still there, just invisible. Transmission-wise, it's there too.
I want to talk about distroless for a second. Google's distroless images are designed to contain only the application and its runtime dependencies. No shell, no package manager, no extraneous utilities. They're great for security — you can't exec into a container and have a shell if there's no shell. But debugging gets harder. No curl, no top, no ps. You need to plan for this. Set up proper log aggregation and stdout monitoring before you go distroless.
Layered vs. distroless is a Slack vs. Discord-level debate in the community. No consensus. But I've seen it work. Where? In our SRE team, on a Go service processing webhooks. We shipped a gcr.io/distroless/static image at 8MB. In production, the only way you could verify it was running was by hitting its /healthz endpoint. That's the way it should be.
BuildKit, Caching, and Remote Builds
Enable BuildKit. It's the default in Docker 23 and later, but if you're on a version where it's not, set DOCKER_BUILDKIT=1. BuildKit gives you several advantages: parallel layer building, better cache invalidation, and the ability to skip unused stages in a multi-stage build. More importantly, it allows you to use COPY --link, which lets you avoid re-copying and re-running downstream layers when only the source code changes. The unnamed gain: you can use cache mounts.
dockerfile
# syntax=docker/dockerfile:1.4
FROM node:20 AS builder
WORKDIR /app
RUN --mount=type=cache,target=/app/node_modules npm install
COPY . .
RUN npm run build
The cache mount persists across builds, so npm install only runs fresh when the package.json actually changes. The same trick works for pip, Maven, Gradle, and Go. When you're running CI multiple times a day, this is a game-changer. The image size isn't affected — this is about build speed. But faster builds mean you can iterate on size optimization without hating your life.
A larger question: is the RUN npm install even the right pattern for a Node service? If you bundle the JS with webpack or esbuild before you build the image, you could copy just the dist/ folder into the final stage and skip node_modules altogether. That's how we ship our frontend apps in person. In this approach, once you finish the build stage, you don't need any dependencies. Final image is 12MB.
The Dirty Secret: You Might Not Need "Docker" at All
Here's a contrarian take. If your images are still too big after all the layer tricks, maybe the issue isn't your Dockerfile — it's your runtime. In 2026, the industry has largely standardized on containerd and runc as the container runtimes. Docker is the developer experience; containerd is the production brain. The containerd vs. Docker post explains that Docker builds images and manages the lifecycle, while containerd is used when running containers in a Kubernetes node.
The reason to mention this in an article about image size: when you use Docker locally, you get a fat daemon. When you run production, you don't need that daemon. You just need the container runtime spec. If you're building with docker build, your image gets its metadata. But if you're building with Buildah or nerdctl, you don't need the Docker daemon at all. You produce an OCI image directly, and not only is it smaller (no Docker-specific metadata layers), but the build is also more secure.
No, wait. That sounds small. But the whole Docker daemon itself isn't small. It has API endpoints, networking stack, storage drivers, and a CLI. In production, if you're running hundreds of containers on a node, you don't want Docker's port-mapping daemon on that node. You want a lightweight runtime. The OCI standard means your image is compatible across runtimes, so if you do this, you're not locking into anything.
The students at an engineering conference I spoke at in late 2025 asked me a different question: "Can you explain Docker architecture in an interview without sounding like a robot?" The question was about "how to explain docker architecture in an interview" — a hot topic on InterviewBit. My answer: talk about the client-server, the daemon, the containerd runtime, the runc binary, and the image registry. Show the interviewer you know Docker isn't a monolith — it's a layered functional system. It's about knowing which layers do what.
Scanning, Analyzing, and Automating Size Reduction
Tools matter. docker history shows you the layer sizes. But for automation, I use dive in CI. dive breaks down image layers, shows you what was added in each layer, and gives you a score on wasted space. If the score is low, the build fails. This is how you enforce image size budgets across different teams.
Another trick: build with a custom registry and use crane to pull the manifest, inspect the layers, and see exactly which layers are huge. The dive method is where the real wins were hidden — I remember when a client showed me their .dockerignore was missing *.mp4 files, and the test fixtures were in the layer. Once we removed them, the image size dropped from 900MB to 300MB. A single .dockerignore line.
You can also automate base image patches. Boring advice, but if you use dependabot or renovate to keep your base images updated, you get security fixes and you get smaller images as they release new OS versions. The two-for-one special.
The Debatable Tricks
user and USER instructions. USER appuser adds an extra layer. Not a big one, but still. Combine it with a RUN where possible.
ENV and ARG. They cache layers. If you're using them to pass data between build stages, be aware that they contribute to cache invalidation. The old secret about ARG DEBIAN_FRONTEND=noninteractive - it isn't just a widget. It prevents apt from prompting, but if you place it in the wrong spot in the Dockerfile, the cache breaks all the time.
Compression is real. gzip and zstd in Docker registry. If your registry supports zstd compression (and in 2026, most do), enable it. It achieves a better compression ratio with faster decompression, which means smaller transfer sizes and lower cold-start latency. But it's a compatibility thing — check that all your production nodes pull with the same compression.
The Interplay with Runtime Performance
Here's the thing people miss when they eat up an image size guide: it's not just about disk and network. Image size affects runtime performance. At SIVARO, we have processed logs from around 200K events per second in production. Each node pulling a bigger image means there's less page cache available on the host OS, so you may have more I/O contention. Smaller images mean filesystem operations are faster and the container startup stays within comfortable limits.
One client in the health sector had a compliance issue: their images had a timestamped build metadata layer that contained a unique hash pointing to the previous build. That was fine, but it meant every build was cached separately. The image repository grew by 500GB per month. After we flattened the recipe and used a standard base image approach, each image was a single layer physically, and their retention policy worked again.
I keep saying "in production" and that's the point. A developer can pull a 3GB image and not care. In production, on a fleet of hundreds of nodes, that 3GB multiplies. At scale, image size isn't an optimization — it's a cost line item.
FAQ: Quick Answers for the Time-Pressed
Why is my docker image so large?
Most likely, you're jumping on the latest version of a base image, or you're pulling dev dependencies and caching files that you don't need at runtime. The quickest fix: rewrite the Dockerfile to use multi-stage builds and chain all your RUN instructions in one layer.
How to reduce docker image size in production?
Use multi-stage builds, select a slim base image, pin the digest, keep ENV/ARG minimal, use .dockerignore, and follow the RUN chaining rules step by step. Additional ways: distroless, multi-architecture builds (amd64 vs arm64 images are separate anyway — build them separately), and zstd compression.
Should I use Alpine in production?
Only if you're comfortable with musl. Test your binaries and native dependencies first. If you use Python and data libs, be careful. For compiled Go or Rust, you are fine.
Is --squash a good idea?
Confirm it doesn't break the build cache. For production, it's unnecessary if you're already using multi-stage. If you're running a legacy Dockerfile that you can't change, it's better than nothing, but it's a temporary crutch.
What's the absolute smallest image you can achieve?
Frankly, 1MB for a "hello world" in Go using FROM scratch. In practice, your final image size will generally be from 10MB to 100MB, unless you're shipping a C++ binary or a model.
Do containers share image layers across nodes?
Yes, Docker stores each layer once per host. If two images on the same host share layers, disk usage is shared. But you can't rely on this behavior when using ephemeral containers in a Kubernetes cluster. The host might be evicted and start fresh.
What's the hardest part of reducing image size in a legacy monorepo?
COPY . . in the early stage — it copies everything. That, and third-party modules that insist on installing the entire SDK just to use a small package.
Why should I care about image size if I only run three containers?
Transfer and funding are still wasted, but also, security scans, registry limits, and storage costs. It's better to build the habit early.
Conclusion
Reducing image size in production is a habit, not a one-time chore. Start with multi-stage builds. Then choose your base image with your eyes open. Tidy up your RUN commands. Automate the analysis with a tool like dive so this becomes a regression test, and not a fire-drill. Docker is not the enemy, but it rewards discipline.
I know I'm supposed to sum things up neatly. But think about it: in the last few years, the container world has gotten deeper and heavier. Kubernetes itself is bloated, most people run 200MB of CRDs just to get 10MB of software running. And the answer to size is still boring: build well, exclude what you don't need, and strip what remains. There are no magic bullets. There is only RUN rm -rf. It's that simple.
Nishaant Dixit — Founder of SIVARO. Building data infrastructure and production AI systems since 2018. Built systems processing 200K events/sec.