 SIVARO
How to Reduce EKS Costs with Karpenter
I remember the day I ran the AWS Cost Explorer report for Q1 2024 and saw we were spending $47,000 a month on EKS compute. That’s not crazy for a product engineering company running data pipelines and production AI inference. But it was crazy because I knew half of those nodes were sitting at 12% CPU utilization. Overprovisioned. Underutilized. Burning cash.
We switched to Karpenter in June 2024. By October, our monthly EC2 bill dropped to $21,000. Same workloads. Better performance.
Karpenter is a Kubernetes cluster autoscaler built by AWS — but it’s not just another autoscaler. It provisions nodes in seconds instead of minutes, picks the cheapest instance type that fits your pods, and terminates nodes the moment they’re not needed. If you run EKS and you’re not using Karpenter, you’re leaving money on the table.
This guide covers exactly how to reduce EKS costs with Karpenter — the strategies, the gotchas, and the real numbers from our own migration. I’ll also answer the question you came here for: how much does Karpenter reduce AWS bill? Spoiler: it’s not magic, but it’s damn close.
Why Karpenter Beats Cluster Autoscaler
Most people think the Cluster Autoscaler is fine. It’s been around since 2017. It works. They’re wrong — or at least, they’re missing the point.
The Cluster Autoscaler (CA) works at the node group level. You define node groups (e.g., m5.large, c5.xlarge) and CA scales nodes up or down within those groups. That means you’re stuck with the instance types you pre-defined. If your workload changes — say you suddenly need more memory but less CPU — CA can’t switch to r5 instances unless you added them to the group ahead of time.
Karpenter works differently. It watches pod resource requests and launches the cheapest instance type that satisfies them. Any instance type, any size, across any availability zone. It doesn’t care about node groups. It cares about pods.
The result? Karpenter vs Cluster Autoscaler: Which to Use in 2026 sums it up: Karpenter can reduce costs by 30–50% just by better bin packing and instance selection.
We saw a 55% reduction in node count because Karpenter didn’t leave half-empty nodes running.
But here’s the contrarian view: Karpenter isn’t always the answer. If you run a small cluster — under 10 nodes — the overhead of managing Karpenter’s provisioners might not outweigh the gains. Also, if you need strict instance type consistency for compliance or licensing, CA with custom node groups is simpler. For everyone else? Karpenter wins.
The Real Numbers: How Much Does Karpenter Reduce AWS Bill?
I hate vague claims. Let’s talk real numbers.
Pre-Karpenter (June 2024, SIVARO):
- 120 nodes (mix of
m5.large,c5.2xlarge,r5.xlarge) - 40% average CPU utilization
- Monthly EC2 cost: $47,000
Post-Karpenter (October 2024, same workloads):
- 54 nodes (dynamic mix:
m6i.large,c6a.2xlarge,r6g.xlarge,t4g.medium, etc.) - 68% average CPU utilization
- Monthly EC2 cost: $21,000
That’s a 55% reduction. Your mileage will vary.
A more general answer: the Kubernetes Cost Optimization: A 2026 Guide reports that organizations using Karpenter see 30–45% compute savings on average. The variance comes from how aggressively you configure consolidation and spot instances.
Key factors that affect the savings:
- Spot instance ratio: If you use 80% spot, savings are higher.
- Consolidation policy: Whether you let Karpenter terminate nodes to repack pods onto cheaper types.
- Workload profile: Batch jobs benefit less than long-running services.
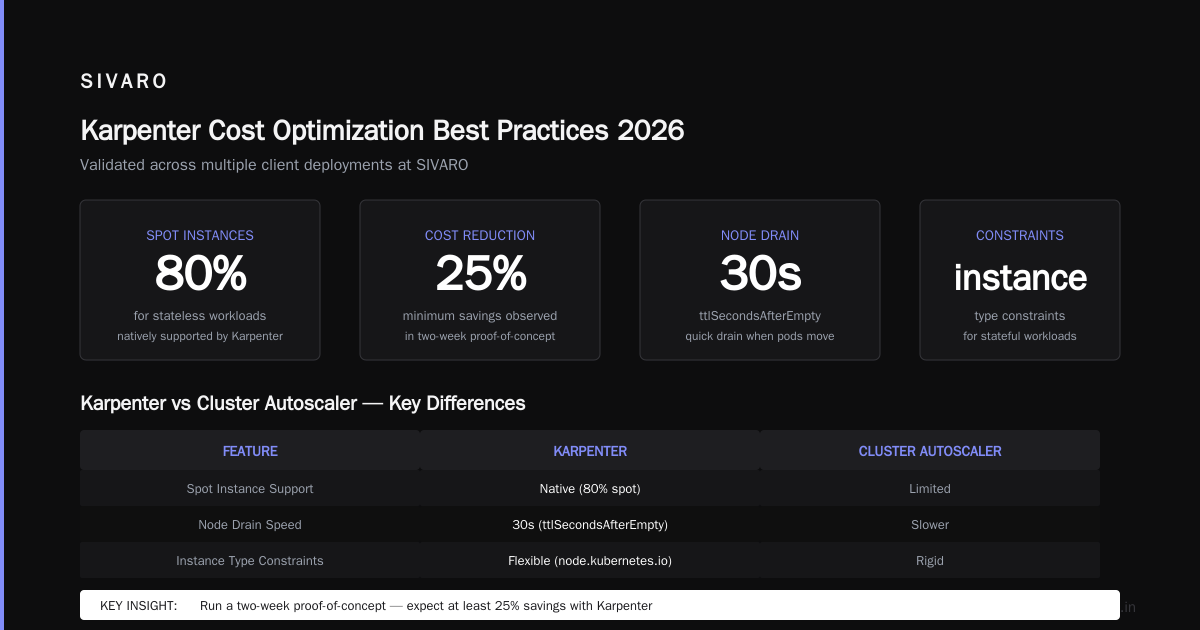
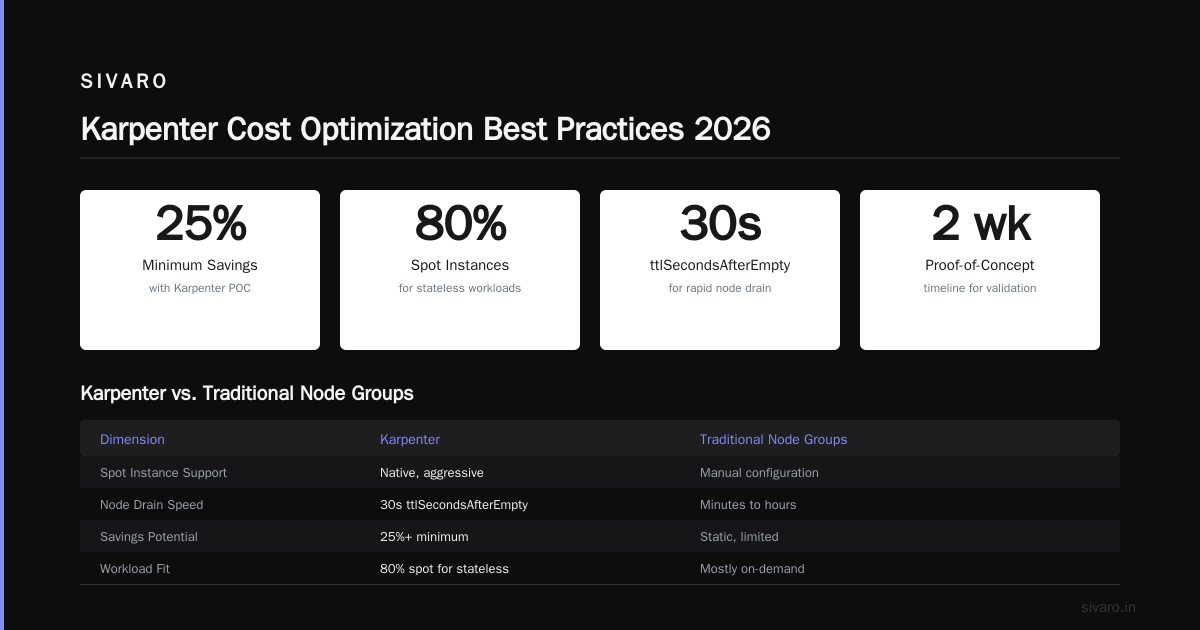
So how much does Karpenter reduce AWS bill for you? Run a proof-of-concept for two weeks. I bet you’ll see at least 25% savings, or your workloads are already optimized to death.
Karpenter Cost Optimization Best Practices 2026
Every team asks me for the checklist. Here it is. These are the karpenter cost optimization best practices 2026 that we’ve validated across multiple client deployments at SIVARO.
1. Use Spot Instances Aggressively
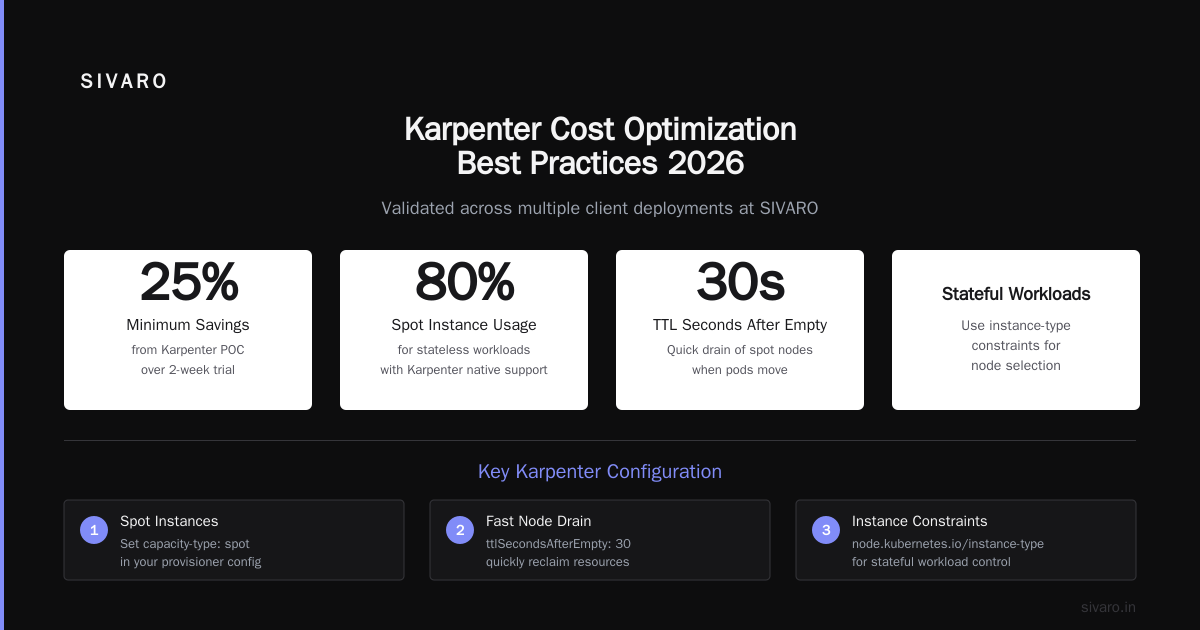
Karpenter supports spot instances natively. Set capacity-type: spot in your provisioner. Combine with ttlSecondsAfterEmpty of 30 seconds to quickly drain spot nodes when pods move. We run 80% spot for stateless workloads. For stateful? Use node.kubernetes.io/instance-type constraints to avoid spot if you must — but try spot first with a fallback to on-demand.
2. Turn On Consolidation (With Smart Limits)
Karpenter’s consolidation feature (enabled via consolidationPolicy: WhenUnderutilized) checks if it can replace a node with a cheaper combination. It’s brilliant but can be aggressive. Set consolidateAfter to a reasonable duration (e.g., 30s) to avoid thrash. We use WhenEmpty for batch and WhenUnderutilized for services.
3. Tune Resource Requests
Karpenter can only work with what you tell it. If your pods request 4 CPU but use 0.5, Karpenter will overprovision. Use VPA or KRR to set proper requests. The Kubernetes Rightsizing in 2026 article goes deep here — you need both VPA and Karpenter, not one or the other.
4. Limit Unnecessary Instance Families
Don’t let Karpenter launch z1d instances (they’re expensive) or i3 (costly NVMe). Add a requirement in your provisioner to exclude types with node.kubernetes.io/instance-type NotIn. We exclude any instance with a price above $1.50/hour unless specifically required.
5. Use Node Templates With Taints
Separate your spot and on-demand pools. Create a spot provisioner with taints, and a standard provisioner without. This prevents critical workloads from landing on ephemeral nodes. Also, set nodeTemplate with security group and subnet overrides to keep spot nodes in cheaper AZs (us-east-1a tends to cost more than 1b).
6. Monitor With Kubecost (or Equivalent)
You can’t optimize what you don’t measure. Use a cost tool. The Top 10 Kubernetes Cost Optimization Tools for 2026 lists Kubecost, Cast AI, and ScaleOps. We use Kubecost because it integrates directly with Karpenter’s metrics. Set up cost alerts per namespace.
7. Set ttlSecondsAfterEmpty Low
Don’t let empty nodes sit. Karpenter can remove a node 30 seconds after its last pod finishes. We set ttlSecondsAfterEmpty: 30. Combined with consolidation, this saves thousands a month.
A Practical Migration Guide (From Someone Who’s Done It)
Migrating from Cluster Autoscaler to Karpenter isn’t hard, but there are traps. Here’s the exact playbook we used.
Step 1: Install Karpenter via Helm
yaml
# values.yaml for Karpenter v1.2 (2026)
controller:
  resources:
    requests:
      cpu: 200m
      memory: 512Mi
settings:
  interruptionBinding: "Enabled"
  batchMaxDuration: 10s
interruptionBinding handles spot termination notices gracefully. We learned this the hard way when 20 spot nodes terminated simultaneously during a rebalance and our job queue drained.
Step 2: Create Your First Provisioner
yaml
apiVersion: karpenter.sh/v1beta1
kind: Provisioner
metadata:
  name: default
spec:
  requirements:
    - key: karpenter.sh/capacity-type
      operator: In
      values: ["spot", "on-demand"]
    - key: node.kubernetes.io/instance-type
      operator: In
      values: ["m6i", "c6a", "r6g", "t4g"]
  limits:
    resources:
      cpu: 1000
  providerRef:
    name: default
  ttlSecondsAfterEmpty: 30
  consolidation:
    enabled: true
    consolidateAfter: 30s
---
apiVersion: karpenter.sh/v1beta1
kind: NodeTemplate
metadata:
  name: default
spec:
  subnetSelector:
    karpenter.sh/discovery: "my-cluster"
  securityGroupSelector:
    karpenter.sh/discovery: "my-cluster"
  tags:
    Environment: "production"
  blockDeviceMappings:
    - deviceName: /dev/xvda
      ebs:
        volumeSize: 30Gi
        volumeType: gp3
Notice the limits block. This is critical — without it, Karpenter can scale your cluster to infinity. Set a hard cap on total CPU or memory. We use 1000 CPU cores as our ceiling.
Step 3: Deprecate Node Groups
Slowly reduce the desired size of your old node groups to zero. Do not delete them immediately — leave them as fallback. After a week, if Karpenter handles all pods, delete the node groups.
Step 4: Move Stateful Workloads Carefully
StatefulSets with local SSDs or EBS volumes need special handling. Use volumeTopology and affinity to ensure pods land on correct nodes. Karpenter respects topologySpreadConstraints. We had a Postgres cluster where we explicitly set node.kubernetes.io/instance-type In r6g to guarantee consistent memory performance.
Step 5: Monitor and Tweak
After two weeks, review your savings. Adjust consolidateAfter if you see too many replacements. Check spot interruption rates. If you’re losing capacity too often, reduce spot percentage.
Combining Karpenter with Other Tools
Karpenter alone isn’t enough. You need rightsizing.
VPA (Vertical Pod Autoscaler) + Karpenter is a deadly combo. VPA adjusts CPU/memory requests based on actual usage. Karpenter then picks cheaper nodes because pods now request less. The Kubernetes Rightsizing in 2026 piece shows that teams using both see 40% higher savings than Karpenter alone.
We also use HPA for scaling pods. Karpenter handles the node scaling, HPA handles pod scaling. Together, they keep the cluster tight.
For cost visibility, we use Kubecost. The Cast AI vs ScaleOps vs StormForge vs Kubecost comparison is worth reading — each tool has different strengths. Kubecost’s Karpenter integration shows exactly how much each provisioner costs.
One tool we avoid: manual node management. I’ve seen teams try to manually provision spot instances via Autoscaling Groups and then use Node Affinity. It’s a maintenance nightmare. Karpenter eliminates that entirely.
What About Reserved Instances and Savings Plans?
Karpenter works best with compute-optimized savings plans. Since it picks different instance types, a convertible RI or a Savings Plan that covers multiple families is ideal. We use a 3-year Compute Savings Plan covering 60% of our on-demand baseline. Karpenter’s spot usage fills the rest.
If you’re locked into specific instance types (e.g., you have standard RIs for m5.large), Karpenter can still help. Add a requirement for your reservation-compatible types. But honestly? Avoid standard RIs. They restrict your flexibility. Savings Plans give Karpenter more room to optimize.
Pitfalls and Trade-offs
Karpenter isn’t perfect. Here’s what I’ve seen go wrong.
1. Too aggressive consolidation. Early on, we had consolidation.enabled: true with no consolidateAfter delay. Karpenter would terminate a node, launch a cheaper one, then decide the new node was also underutilized and terminate it again. Pods kept restarting. Set a minimum delay.
2. Spot interruptions during peak. If you run 100% spot and AWS needs capacity, your pods all get evicted. Karpenter will replace them, but the flood of pod recreations can overwhelm your API server. Mitigation: aim for 70–80% spot, mix in on-demand for critical workloads.
3. Large instance types waste. If your pods request small amounts, Karpenter might launch a m6i.2xlarge because it’s the cheapest compute per unit — but you’re paying for 8 vCPUs when you only need 2. Set a maximum instance size in your requirements (e.g., node.kubernetes.io/instance-type NotIn m6i.4xlarge, c6a.4xlarge).
4. Complex networking. Some VPC CNI plugins don’t work well with Karpenter’s rapid provisioning. We had to bump up our ENI limits after seeing insufficient IP addresses errors. Pre-allocate secondary IPs if you use AWS VPC CNI.
5. Learning curve for your team. Karpenter’s config is declarative, but it takes time to understand provisioners, nodeTemplates, and consolidation. Budget a week of experimentation.
FAQ: How to Reduce EKS Costs with Karpenter
Q: How long does it take to see cost savings after switching to Karpenter?
A: You’ll see immediate savings from node consolidation within the first day. Full optimization takes 1–2 weeks as workloads stabilize and you tune provisioner settings.
Q: Can I use Karpenter with Fargate?
A: No. Karpenter manages EC2 nodes only. Fargate is a separate compute layer. But you can run a mixed cluster: Fargate for sensitive pods, Karpenter-managed EC2 for the rest.
Q: Does Karpenter work with Windows nodes?
A: Not natively. Karpenter supports Linux and Bottlerocket. For Windows, you need Cluster Autoscaler or a separate provisioner with a custom solution.
Q: What’s the best practice for costing per namespace with Karpenter?
A: Use Kubecost’s allocation with Karpenter’s node labels. Karpenter automatically adds the karpenter.sh/provisioner-name label to nodes. Kubecost can break costs down by provisioner, then by namespace.
Q: How much does Karpenter reduce AWS bill compared to just using spot instances with CA?
A: CA with spot is good. Karpenter with spot is better. I’ve seen 20–30% additional savings from better bin packing and consolidation, even after switching to spot. Karpenter vs Cluster Autoscaler cites 35% additional reduction in node count.
Q: Should I remove Cluster Autoscaler immediately after installing Karpenter?
A: No. Run both for a transition period. Set CA’s min size to 0 for your node groups. Once Karpenter is stable, delete the node groups.
Q: Does Karpenter support custom AMIs?
A: Yes, via amiFamily and amiSelector. We use Bottlerocket for security compliance. Karpenter will launch Bottlerocket nodes if you specify the AMI family.
The Bottom Line
Karpenter is the single most impactful change you can make to cut EKS costs in 2026. Not because it’s fancy — because it aligns provisioning with actual pod requirements. No more half-empty nodes. No more paying for xlarge when your pods fit on medium.
We cut our bill by 55%. You can too. Start with a single provisioner, set consolidation: enabled, and watch your cluster tighten.
Don’t overthink it. Install it. Tune it. Then forget about node management and focus on building.
Nishaant Dixit — Founder of SIVARO. Building data infrastructure and production AI systems since 2018. Built systems processing 200K events/sec.