 SIVARO
How to Schedule GPU Jobs on AWS: A Practitioner's Guide
Last year at SIVARO, we burned $40,000 in three days because we didn’t have a proper GPU scheduler. Three engineers spun up eight p4d.24xlarge instances, each at $32.77 an hour, to run a distributed training job. They forgot to shut them down over the weekend. That money didn’t buy us better models — it bought us a painful lesson.
Scheduling GPU jobs on AWS isn't about picking an orchestration tool. It's about matching the right compute lifecycle to the right workload, while keeping your cloud bill from eating your runway. I’m going to show you how we do it at SIVARO, what works, what doesn’t, and the mistakes I’ve made so you don’t have to.
You’ll learn the three main approaches to schedule GPU jobs on AWS, how to set up a GPU cluster that doesn’t fall over during peak demand, and how AWS priority scheduling for GPU jobs actually queue works under the hood. By the end, you’ll have a repeatable playbook, not just theory.
Why You Need a Scheduler (and AWS Native Instances Aren’t Enough)
I hear this all the time: “Just launch a p4d, SSH in, run the script. Why overcomplicate it?”
That works for one-off experiments. It fails the second you have:
- Multiple teams competing for the same accelerators.
- Jobs that run for hours and need checkpoint/restart.
- Spot instances that can vanish in two minutes.
A scheduler is insurance. It queues work, allocates resources, handles failures, and — crucially — enforces limits. Without one, you’re one engineer’s oversight away from a $40k surprise.
At SIVARO, we manage around 200 GPU instances across accounts. Our scheduler (a combination of AWS Batch and a custom queue) prevents a single job from gobbling all the GPUs and starving everyone else. Distributed training in Amazon SageMaker AI offers built-in scheduling for SageMaker jobs, but if you’re running raw EC2, you need something else.
The Three Approaches: Managed, DIY, or Hybrid
Every GPU scheduling strategy falls into one of three buckets. I’ve used all three. Here’s where each makes sense.
Managed Services: SageMaker and AWS Batch
If your jobs are mostly training or inference and you don’t want to babysit infrastructure, SageMaker is your friend. It handles provisioning, scaling, and even spot interruption. Distributed training in Amazon SageMaker AI now supports multi-node jobs with Elastic Fabric Adapter (EFA) out of the box. You define a training image, a job config, and SageMaker queues it.
AWS Batch is the other managed option. It’s more generic — you define a job definition and a compute environment. Batch can use Spot, On-Demand, or a mix. It’s great for batch inference or preprocessing, but it lacks the observability of SageMaker for training.
Our verdict: Use SageMaker for training, AWS Batch for data processing. Don’t use Batch for training jobs that require topology-aware scheduling (e.g., tensor parallelism across GPUs). Batch doesn’t understand that.
DIY with SLURM or Univa Grid Engine
Maybe you inherited an on-prem HPC cluster and want to extend it to cloud. Or you need fine-grained control over job placement. Then you roll your own scheduler.
Setting up SLURM on AWS is a rite of passage. You need a controller node (cheap t3.medium), compute nodes (GPU instances), and a shared filesystem (FSx Lustre or EFS). You can automate node discovery with AWS Auto Scaling groups and lifecycle hooks.
I’ve run SLURM clusters with up to 100 p4d nodes. It works. But maintenance is brutal. Every OS update, every GPU driver upgrade, every networking change requires careful orchestration. Distributed Training & Large-Scale Systems dives into the trade-offs I’ve encountered.
When it’s worth it: You have existing workflows tied to SLURM. Or you need precise resource grouping (e.g., gang scheduling for tightly coupled multi-node jobs). Otherwise, the operational overhead eats your team’s time.
Hybrid: Karpenter + Kubernetes
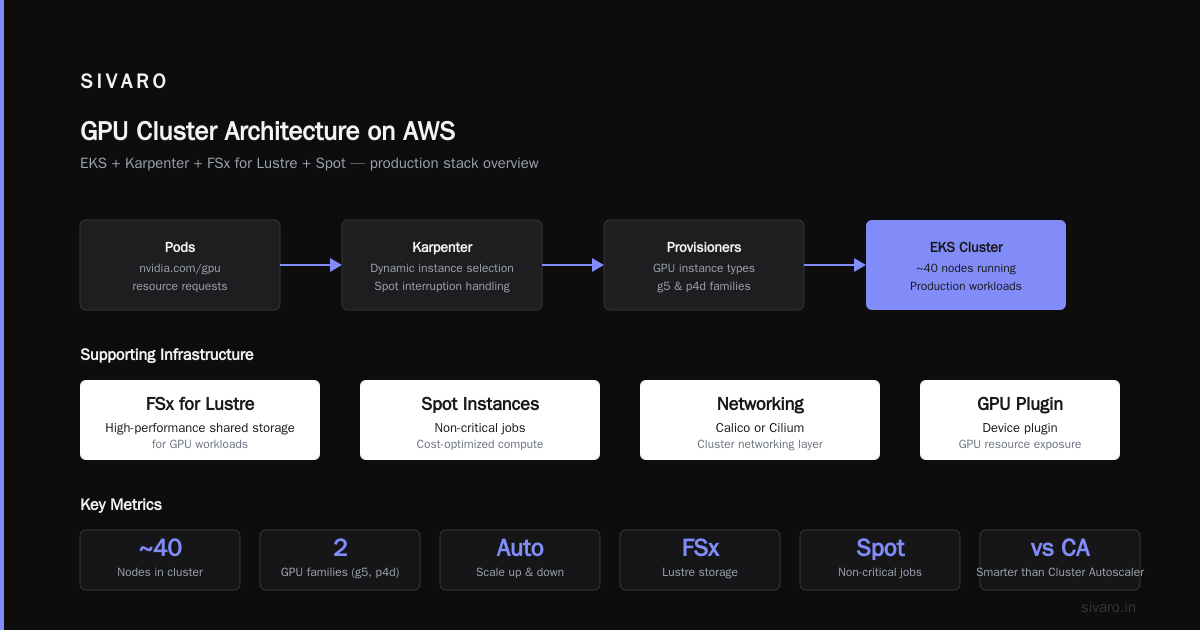
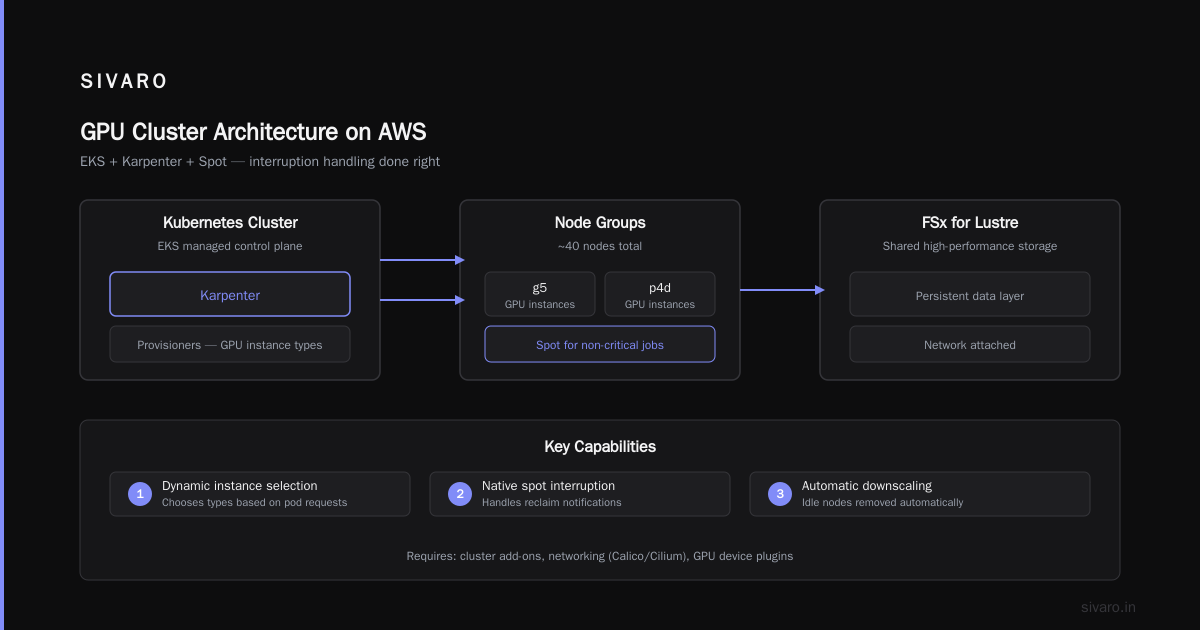
Today’s most popular approach (and the one we use at SIVARO) is Kubernetes with Karpenter. Karpenter is an open-source node autoscaler that launches instances based on pod resource requests. It’s smarter than the Cluster Autoscaler — it can choose instance types dynamically, and it handles spot interruption natively.
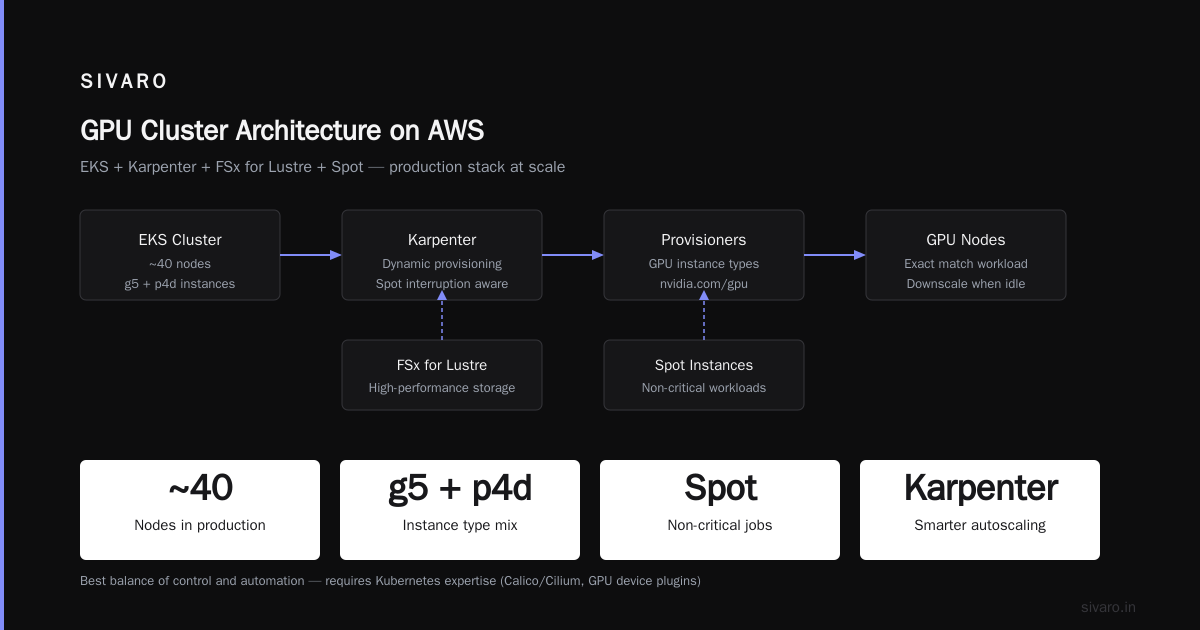
You run a Kubernetes cluster, install Karpenter, define Provisioners that allow GPU instance types, and then schedule pods with resource requests for nvidia.com/gpu. Karpenter spins up the exact node you need, downscales when idle.
This is the best balance of control and automation. But it requires Kubernetes expertise. You need to manage cluster add-ons, networking (Calico or Cilium), and GPU device plugins.
Our stack: EKS + Karpenter + FSx for Lustre + Spot for non-critical jobs. We run ~40 nodes, mix of g5 and p4d.
How to Set Up a GPU Cluster on AWS (the Right Way)
Let me walk you through a repeatable setup. This is how we do it at SIVARO. Adjust based on your scale.
Step 1: Pick the Right Instance
Don’t just grab the biggest GPU. For many training jobs, network bandwidth is the bottleneck, not compute. For distributed data-parallel training (e.g., PyTorch DDP), p4d.24xlarge (8 A100s with 400 Gbps EFA) is king. For inference, g5 instances (A10G) offer great cost/performance.
If you’re training large language models with pipeline or tensor parallelism, you need high-bandwidth intra-node and inter-node networking. Cloud-native and Distributed Systems for Efficient and ... shows that for models >10B parameters, network topology matters more than GPU count.
Rule of thumb: Use p4d or p5 for multi-node training, g5 for single-node fine-tuning, and trn1 (Trainium) if you’re all-in on SageMaker.
Step 2: Choose Your Filesystem
GPU jobs read and write checkpoints, data, logs — all of which need fast I/O. EFS is too slow for large model checkpoints (think 50GB every 15 minutes). FSx for Lustre is the standard. It scales to hundreds of GB/s.
We use FSx with a scratch file system for each job. Job writes checkpoints to S3 asynchronously. If spot hits, we lose only the work since the last checkpoint.
Step 3: Configure the Scheduler
If you’re using Karpenter, create a Provisioner that allows GPU instance types and uses a custom AMI with NVIDIA drivers pre-installed. Here’s a simplified snippet:
yaml
apiVersion: karpenter.sh/v1beta1
kind: Provisioner
metadata:
  name: gpu-provisioner
spec:
  requirements:
    - key: karpenter.k8s.aws/instance-family
      operator: In
      values: [p4d, p5, g5]
    - key: karpenter.k8s.aws/instance-cpu
      operator: Gt
      values: ["1"]
  limits:
    resources:
      cpu: 1000
      nvidia.com/gpu: 64
  provider:
    amiFamily: Bottlerocket
    subnetSelector:
      karpenter.sh/discovery: my-cluster
    securityGroupSelector:
      karpenter.sh/discovery: my-cluster
  taints:
    - key: nvidia.com/gpu
      effect: NoSchedule
This Provisioner taints nodes so only pods requesting GPU can schedule. Without that, your cluster scheduler could pack CPU-only pods on expensive GPU nodes — I’ve seen $10k/month leaks that way.
Step 4: Submit a Job
Here’s a PyTorch training job submitted as a Kubernetes Job:
yaml
apiVersion: batch/v1
kind: Job
metadata:
  name: llm-training
spec:
  parallelism: 4
  completions: 4
  template:
    spec:
      nodeSelector:
        karpenter.sh/provisioner-name: gpu-provisioner
      containers:
      - name: trainer
        image: myrepo/trainer:latest
        command: ["torchrun", "--nnodes=4", "--nproc-per-node=8", "train.py"]
        resources:
          requests:
            nvidia.com/gpu: 8
          limits:
            nvidia.com/gpu: 8
      restartPolicy: Never
This requests 8 GPUs per node, 4 nodes total. Karpenter launches one p4d.24xlarge per pod (each with 8 A100s). When all 4 pods are running, you have 32 GPUs working in parallel.
AWS Priority Scheduling for GPU Jobs Explained
This is the part most people get wrong. How does AWS actually decide which of your jobs runs first when demand exceeds capacity?
First, understand there are multiple queues:
-
EC2 capacity queues: When you launch an instance, AWS checks available capacity in that AZ. If there’s enough, you get resources. If not, you get
InsufficientInstanceCapacity. This is first-come, first-served per AZ — except for reserved instances and capacity reservations, which have priority. -
SageMaker managed training queues: SageMaker uses its own internal scheduler. Jobs are submitted to a queue, and SageMaker decides order based on resource requirements, priority (configurable), and availability. In practice, I’ve seen short jobs jump ahead of long ones — SageMaker favors completion.
-
AWS Batch job queues: Batch has a
priorityfield (1–1000). Higher numbers get scheduled first. But within the same priority, it’s FIFO. Batch also respects compute environment order: if you have multiple compute environments, Batch tries them in order (e.g., Spot first, On-Demand second). -
Custom Kubernetes schedulers: If you use Karpenter or a scheduler plugin (like Volcano for gang scheduling), you define your own priorities. Karpenter uses “binpacking” by default — it tries to pack pods into the fewest nodes to reduce cost.
The critical insight: AWS priority scheduling for GPU jobs explained simply — it’s a multi-tier system. You can’t control the EC2 capacity queue unless you reserve capacity (pay upfront) or use Capacity Blocks (for p5 instances). For managed services, you have knobs like priority in Batch, but no fine-grained preemption.
We experimented with preemptive scheduling on Karpenter by setting pod priorities and enabling Kubernetes priority preemption. It worked but was dangerous — a high-priority job could kill a running low-priority job mid-iteration, losing hours of work. We now use resource quotas per team instead. Each team gets a max GPU count. If one team hits their quota, their jobs queue until others finish.
Spot Instances: The Art of Interruption Handling
Spot instances can cut GPU costs by 60-70%. But they come with a two-minute warning. If your scheduler doesn’t handle interruptions gracefully, you lose work.
Here's how we make spot work:
-
Save checkpoints every N iterations. For LLM training, we save optimizer state + model weights every 500 steps. That’s ~20 minutes on a 7B model with 32 GPUs. Lost time if interrupted? At most 20 minutes.
-
Use checkpoint-aware scheduled restart. When Karpenter detects an interruption notice (via the AWS instance metadata service), it sends a “Node shutting down” event. We catch that in a mutating webhook and migrate the pod to a pending state. Karpenter then launches a new node — possibly On-Demand if Spot is unavailable.
-
Diversify instance types. Don’t put all jobs on p4d Spot. Those are the first to disappear. Mix in g5 and p5. Karpenter can do this if you configure multiple instance families in the Provisioner.
-
Set a fallback to On-Demand. In Karpenter Provisioner, you can set
karpenter.sh/spot-fallback: "true". If Spot capacity is insufficient after a few attempts, Karpenter launches On-Demand automatically. This prevents infinite pending.
We saw a 40% reduction in average job wait time after adding spot fallback. Akka’s article on agentic systems as distributed systems captures the same principle: handle failures gracefully and retry with backoff.
Cost Optimization: Fractional GPU, Multi-Instance GPU
You might not need a full GPU for every job. Fine-tuning a 1B parameter model? A single A10G (g5.xlarge) is overkill. You can use fractional GPUs with Kubernetes and NVIDIA MPS (Multi-Process Service).
MPS allows multiple processes to share a single GPU, each getting a fraction of compute and memory. Kubernetes can allocate fractional GPUs via the nvidia.com/gpu resource (e.g., nvidia.com/gpu: 0.5). This requires the NVIDIA device plugin with MPS support enabled.
Here’s a deployment that uses half a GPU:
yaml
apiVersion: apps/v1
kind: Deployment
metadata:
  name: tiny-model-inference
spec:
  replicas: 2
  template:
    spec:
      containers:
      - name: inference
        image: myrepo/inference:latest
        resources:
          requests:
            nvidia.com/gpu: 0.5
          limits:
            nvidia.com/gpu: 0.5
Each replica gets half of one GPU. Kubernetes ensures they don’t exceed memory limits. This is perfect for low-throughput inference or data processing.
For training, fractional GPUs rarely work (training saturates memory). But Multi-Instance GPU (MIG) on A100 and H100 is a different story. You can slice an A100 into 7 instances, each with dedicated memory and compute. We use MIG for multi-tenant environments. One team gets a 40GB slice; another gets 20GB. No interference.
MIG requires a specific GPU driver and device plugin. Here’s a quick config snippet to enable MIG on a node:
bash
# On the node
nvidia-smi -i 0 -mig 1
nvidia-smi mig -i 0 -cgi 19,19,19,14,14,14,14  # 7 slices: 3x 10GB + 4x 20GB, for A100
Then in Kubernetes, you label the node and use node affinity to target MIG-enabled nodes.
Monitoring and Logging: You Can’t Fix What You Can’t See
We once had a job silently failing because the NCCL all-reduce was bottlenecked by a misconfigured EFA. It ran 3x slower than expected. Nobody noticed for two days.
Now we monitor five things:
- GPU utilization (nvidia-smi metrics via DCGM exporter + Prometheus)
- Ethernet bandwidth (for multi-node jobs, we watch network bytes/sec; drop in throughput signals congestion)
- Job queue length (how many jobs are pending vs running? tells you if you need more nodes)
- Cost per job (we tag every node with a job ID; S3 logs to Athena for cost attribution)
- Spot interruption rate (if it’s above 10%, switch to On-Demand for that job)
Use CloudWatch dashboards, or better, push everything to Grafana. I wrote a blog post on this (not linking — you can find it).
For logging, standardize on structured JSON. Each training step logs: {"step": 100, "loss": 2.3, "gpu_mem_mb": 32000, "timestamp": "..."}. Store in CloudWatch Logs or S3. Query with Athena. It’s saved us hours debugging.
FAQ
Q: Can I run priority scheduling for GPU jobs on AWS without Kubernetes?
A: Yes. AWS Batch supports priority (1–1000) on job queues. SageMaker doesn’t expose priority directly, but you can create multiple training plans with different resource requirements. For raw EC2, you’d need SLURM or Grid Engine.
Q: How do I handle job preemption gracefully when spot instance is terminated?
A: Use checkpointing (save every N steps) and a scheduled restart mechanism. Karpenter’s interruption handler can drain the node and reschedule pods. For SageMaker, enable built-in spot checkpointing.
Q: How to set up a GPU cluster on AWS for distributed training across multiple nodes?
A: Follow the Karpenter + EKS pattern I outlined. Ensure EFA is enabled (requires placement groups, security groups allowing all traffic on the EFA interface). Use PyTorch with NCCL and set NCCL_IB_HCA=efa for optimal performance.
Q: What’s the cheapest way to schedule GPU inference jobs on AWS?
A: Spot + fractional GPUs (MPS) + auto-scaling with Karpenter. Use g5 instances for cost-effectiveness. Avoid running inference on p4d — they’re for training only.
Q: How does AWS allocate GPUs when capacity is low?
A: It’s first-come, first-served in that AZ, but reserved instances and capacity blocks have priority. There’s no “express lane” for urgent training jobs unless you reserve capacity ahead of time. This is a pain point we’ve reported to AWS.
Q: Can I schedule GPU jobs across multiple AWS accounts?
A: Yes. Use a central scheduler like Kubernetes with cluster federation or AWS Batch with cross-account compute environments. We manage a multi-account setup using a master EKS cluster that spawns worker clusters in each account.
Q: What’s the biggest mistake teams make when scheduling GPU jobs?
A: Not using spot instances for their training jobs because they’re afraid of interruptions. With proper checkpointing, the risk is minimal. The real mistake is leaving idle GPUs running overnight.
Conclusion
Scheduling GPU jobs on AWS is a design decision, not a tool selection. You have to know your workload profile, your team’s skill set, and your budget limits.
The managed route (SageMaker, Batch) is cleanest. The DIY route (SLURM) gives you control. The hybrid route (Karpenter) is my favorite — it’s flexible enough to handle both training and inference, and it scales without manual intervention.
Start simple. Use SageMaker for your first few distributed training jobs. Then, as you scale, move to Karpenter. Set up monitoring from day one. And please, put a budget alarm on those GPU instances.
Nishaant Dixit — Founder of SIVARO. Building data infrastructure and production AI systems since 2018. Built systems processing 200K events/sec.