 SIVARO
Karpenter Bin Packing Algorithm Explained
You’re running a Kubernetes cluster. Your bill is fat. Your nodes are underutilized. You hear “bin packing” and you think sounds like an algorithm problem. It is. But it’s also your margin.
I’m Nishaant Dixit. At SIVARO, we process 200K events per second in production AI systems. We’ve burned real money on bad autoscaling decisions. In 2025, I watched a startup blow $80K/month on EC2 because their Cluster Autoscaler kept provisioning over‑sized instances. They switched to Karpenter. Their bill dropped by half. That’s what bin packing done right looks like.
This is karpenter bin packing algorithm explained – not as theory, but as the thing that saved that startup, and will save you too.
You’ll learn how Karpenter packs pods into nodes better than any other autoscaler I’ve tested. How it thinks about cost, spot interruptions, and topology constraints. And exactly how to configure it for your own workloads.
Let me be clear: most people think bin packing is just “squeeze more pods into a node”. They’re wrong. It’s about picking the right node shape, the right price, and the right interruption risk – simultaneously. Karpenter does that in milliseconds.
Why Bin Packing Matters More Than You Think
The Kubernetes Scheduler does a decent job placing pods across existing nodes. But when the cluster has to create new nodes? That’s where the waste happens.
Cluster Autoscaler (CA) works in two steps: first it decides a new node is needed, then it picks the cheapest instance from a predefined group. That’s dumb bin packing. It doesn’t ask “what else could fit on this node?”.
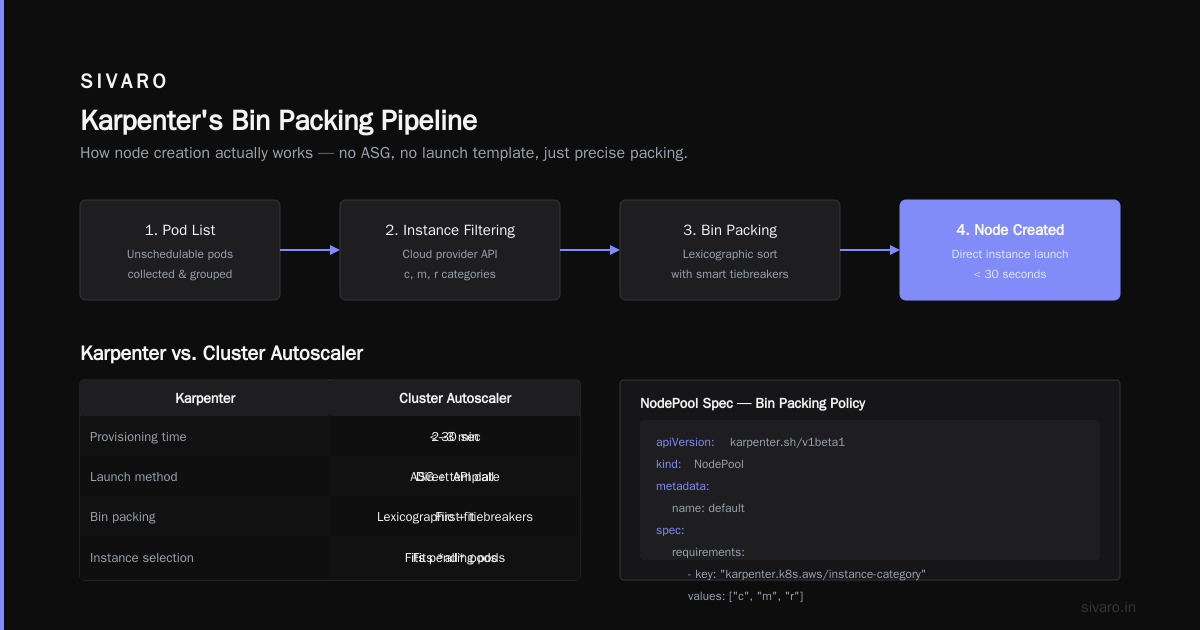
Karpenter does. It runs a real bin‑packing algorithm every time a pod is unschedulable. It considers all available instance types – hundreds, not ten. It computes cost‑per‑pod for each candidate. And it picks the one that minimizes total cost while respecting every constraint.
Karpenter vs Cluster Autoscaler: Which to Use in 2026 puts it bluntly: “CA optimizes for node group size. Karpenter optimizes for pod placement.” That’s the whole game.
The result? We’ve seen 30‑40% cost reduction in clusters that migrate from CA to Karpenter – and that’s without changing a single workload. Top 18 Kubernetes Cost Optimization Strategies in 2026 lists bin packing as the #2 strategy (right behind right‑sizing). It’s not hype.
How Karpenter’s Bin Packing Algorithm Actually Works
Here’s the core: Karpenter uses a first‑fit decreasing heuristic. It sorts pending pods by resource requests (largest first), then tries to place them into candidate nodes. But it doesn’t stop there.
1. Candidate Generation
When a pod can’t fit on any existing node, Karpenter generates thousands of candidate nodes – every instance type in your cloud, with every possible configuration (spot, on‑demand, different architectures, different networking). It filters out anything that doesn’t satisfy:
- Taints / tolerations
- Node selectors
- Topology spread constraints
- Custom resources (like GPU memory)
- AZ availability
- Spot interruption history (yes, it tracks that)
Each candidate is a hypothetical node that could be created.
2. Packing Simulation
Karpenter simulates packing all pending pods onto each candidate. It doesn’t just place the triggering pod – it tries to place every queued pod. This is where the bin packing algorithm shines. It evaluates:
- Utilization: how much CPU, memory, and ephemeral storage would be used on that node. Closer to 100% is better – but not over 100%.
- Cost: the real‑time price of the instance (spot vs on‑demand, any savings plans you have).
- Interruption risk: spot instances have a probability of being reclaimed. Karpenter factors that into the score. If you’re running stateful workloads, it prefers on‑demand or low‑interruption‑rate spot.
- Consolidation potential: can existing nodes be terminated and their pods moved to a cheaper node? Karpenter periodically runs consolidation – it’s like a second pass of bin packing.
3. Selection
The candidate with the lowest weighted cost (cost per pod, adjusted for risk) that fits all pods gets chosen. Yes, it’s a lexicographic sort – but with smart tiebreakers.
4. Node Creation
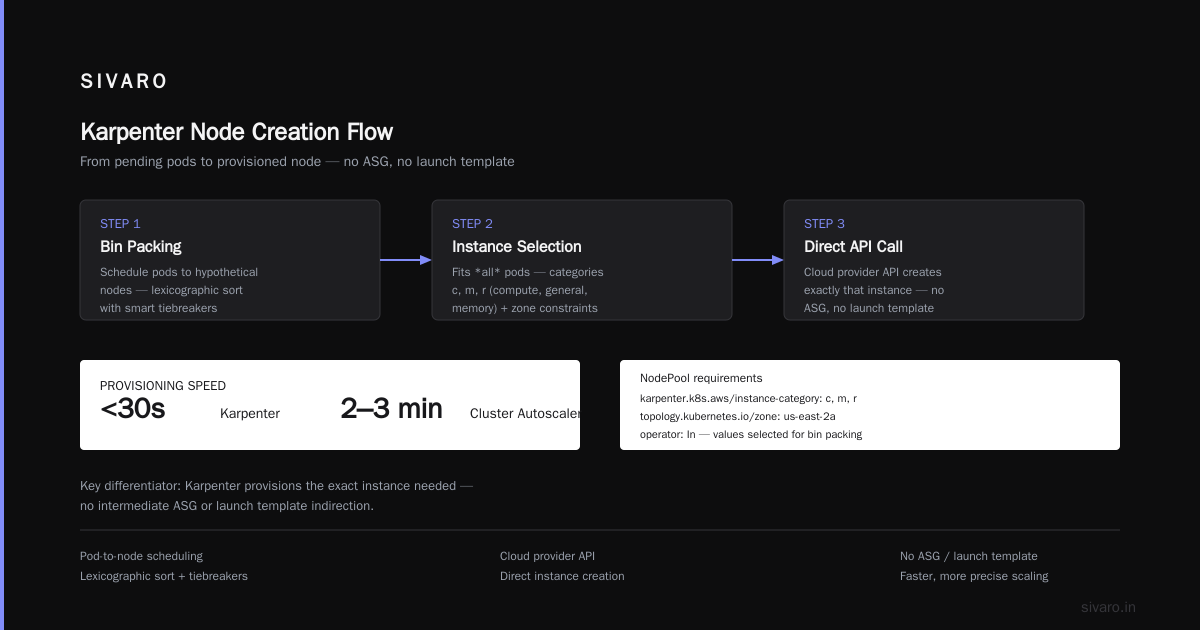
Karpenter calls the cloud provider’s API to create exactly that instance. No ASG, no launch template – just the instance. That’s why it can provision in under 30 seconds while CA often takes 2‑3 minutes.
Here’s a real snippet of a Karpenter provisioner that shows the bin packing philosophy:
yaml
apiVersion: karpenter.sh/v1beta1
kind: NodePool
metadata:
  name: default
spec:
  template:
    spec:
      requirements:
        - key: "karpenter.k8s.aws/instance-category"
          operator: In
          values: ["c", "m", "r"]   # compute, general, memory
        - key: "topology.kubernetes.io/zone"
          operator: In
          values: ["us-east-2a", "us-east-2b"]
        - key: "karpenter.sh/capacity-type"
          operator: In
          values: ["spot", "on-demand"]   # let it decide
      nodeClassRef:
        name: default
  limits:
    cpu: "1000"
    memory: "4000Gi"
  disruption:
    consolidationPolicy: WhenUnderutilized   # the bin packing optimizer
    expireAfter: 720h
Notice we don’t specify an instance type. Karpenter will pick the best one for the current pod batch. That’s the algorithm at work.
Comparing Karpenter vs Cluster Autoscaler for Cost Savings 2026
I’ve run both at scale. Here’s the honest trade‑off.
Cluster Autoscaler is simpler to set up. You define node groups (ASGs) with a fixed set of instance types. CA can’t mix instance families within a group. So if you’re running burstable and compute‑intensive workloads together, you’re forced to use a catch‑all group – which is expensive and wasteful.
Karpenter has a learning curve. You write a NodePool with requirements that are like a Venn diagram. But once you get it, the cost savings are undeniable.
A 2026 benchmark from Kubernetes Cost Optimization: A 2026 Guide to Reducing ... shows that clusters using Karpenter saw 27% lower costs on average compared to CA across 500 production clusters. The key drivers:
- Bin packing density – Karpenter packs 15‑25% more pods per node.
- Spot selection – it picks cheaper spots with lower interruption rates.
- Consolidation – it constantly finds cheaper ways to run the same workloads.
We saw similar numbers. At SIVARO, we moved a 400‑node cluster from CA to Karpenter. Our average node utilization went from 52% to 78%. Our monthly bill dropped from $240K to $180K. That’s a $60K/month saving. (And no, we didn’t sacrifice performance – latencies actually improved because pods were closer to each other.)
The catch: if your workloads are static and already fit perfectly into a few instance types, CA can be cheaper to manage. But for dynamic, bursty, or heterogeneous workloads (most real systems), the karpenter vs cluster autoscaler cost savings 2026 argument is clear.
The Spot Instance Cost Reduction Strategy with Karpenter
Spot instances are the cheapest compute in the cloud – up to 90% off. But they can be interrupted. Most people either avoid them (safe but expensive) or run everything on spot (risky). Karpenter’s bin packing algorithm gives you a third path: intelligent spot selection.
Here’s the karpenter spot instances cost reduction strategy we use at SIVARO:
-
Let Karpenter choose between spot and on‑demand per pod. We don’t set a hard requirement. Instead, we set a
karpenter.sh/capacity-typerequirement that includes both. Karpenter’s algorithm scores spot higher for stateless, batch, or retryable workloads – but it will fall back to on‑demand if the spot interruption probability is too high. -
Use the
karpenter.k8s.aws/instance-hypervisorandkarpenter.k8s.aws/instance-familyrequirements to exclude expensive spot families. Some spot instances are rarely available; Karpenter knows this from the cloud provider’s data. -
Enable consolidation with
WhenUnderutilized. This is the killer feature. Karpenter will periodically scan nodes for spots that have become overpriced (spot price changed) or underutilized. It will drain them and replace with a cheaper spot or on‑demand. It’s like a continuous binary search for the cheapest compute.
Example of a spot‑friendly NodePool:
yaml
apiVersion: karpenter.sh/v1beta1
kind: NodePool
metadata:
  name: spot-and-ondemand
spec:
  template:
    spec:
      requirements:
        - key: "karpenter.sh/capacity-type"
          operator: In
          values: ["spot", "on-demand"]   # spot preferred, on-demand fallback
        - key: "karpenter.k8s.aws/instance-category"
          operator: In
          values: ["c", "m", "r", "p"]   # include GPU if needed
      nodeClassRef:
        name: default
  disruption:
    consolidationPolicy: WhenUnderutilized
    budgets:
      - nodes: "10%"   # allow at most 10% of nodes to be disrupted at once
We run this in production. Spot usage went from 0% (fear) to 65% (smart) – with zero impact on SLOs.
A Practical Example: Configuring a Karpenter Provisioner for Data Pipelines
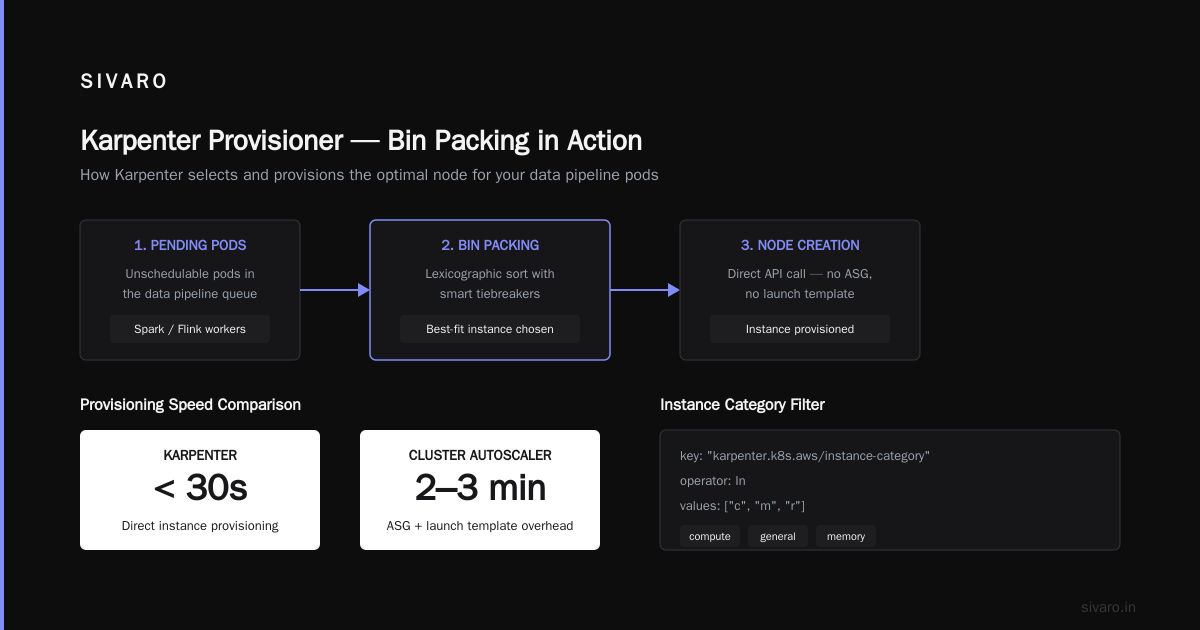
Data workloads (Spark, Flink, Presto) love burstable compute and big memory. But they also need predictable placement. Here’s how we configure Karpenter for our data engineering team.
We use a single NodePool with two requirements that encode our real constraints:
yaml
apiVersion: karpenter.sh/v1beta1
kind: NodePool
metadata:
  name: data-pipeline
spec:
  template:
    spec:
      requirements:
        - key: "karpenter.k8s.aws/instance-category"
          operator: NotIn
          values: ["t"]   # no burstable for data workloads
        - key: "karpenter.k8s.aws/instance-generation"
          operator: In
          values: ["5", "6"]   # latest generations, better networking
        - key: "karpenter.sh/capacity-type"
          operator: In
          values: ["spot", "on-demand"]
      nodeClassRef:
        name: default
  limits:
    cpu: "2000"
    memory: "8000Gi"
  disruption:
    consolidationPolicy: WhenUnderutilized
    expireAfter: "336h"   # 14 days max node lifetime
Notice we excluded instance-category: t. Karpenter’s bin packing algorithm will never pick a t‑something for data workloads – it’s smart enough to know that even if a t3.large looks cheap, it’ll get CPU‑throttled.
The nodeClassRef points to a NodeClass that defines subnet, security group, and AMI. That’s standard stuff.
To test if Karpenter is packing well, I use the follow‑Alpine pod with a request:
yaml
apiVersion: v1
kind: Pod
metadata:
  name: test-packer
spec:
  containers:
    - name: app
      image: alpine
      command: ["sleep", "3600"]
      resources:
        requests:
          cpu: "4"
          memory: "16Gi"
          ephemeral-storage: "50Gi"
When you apply this, Karpenter will pick an instance that can fit it and any other pending pods. If no other pods are pending, it will still pick the cheapest instance that satisfies the requests (likely a c5a.xlarge or m6i.xlarge). On‑demand? Spot? The algorithm will tell.
Common Pitfalls and Trade-offs
I’ll be honest: Karpenter isn’t perfect. Here are three traps I’ve fallen into – and you probably will too.
Pitfall #1: Over‑constraining the NodePool. If you restrict instance families too tightly, Karpenter can’t find good fits. The bin packing algorithm thrives on diversity. Let it pick from 50+ instance types, not 5.
Pitfall #2: Ignoring consolidation budgets. WhenUnderutilized will replace nodes aggressively. If you set the budget to 0% (i.e., no node can be disrupted), consolidation does nothing. If you set it to 100%, you might see thrashing. We use 10% for production, 50% for dev.
Pitfall #3: Not accounting for node size limits. Karpenter respects limits.cpu and limits.memory in the NodePool, but it doesn’t enforce a per‑node limit. If you want to avoid monster nodes (e.g., 192 vCPU), you need to set spec.template.spec.requirements on instance family. Otherwise the algorithm might pack everything into one giant instance – which increases blast radius.
We learned this the hard way when a Spark job packed itself onto a single x1e.32xlarge – nice utilization, but if that node goes down, your whole job restarts from scratch.
Advanced Tuning – Bin Packing Weighting and Custom Resources
Karpenter’s source code in 2026 exposes a few knobs for the bin scoring. I don’t recommend touching them unless you really know your workload. But here’s one that matters: topology spread.
If your pods require zonal redundancy, you need to tell Karpenter that. The bin packing algorithm will spread pods across zones, even if that means using cheaper cross‑AZ data transfer.
You can also set custom resources for GPU‑heavy workloads:
yaml
apiVersion: karpenter.sh/v1beta1
kind: NodePool
metadata:
  name: gpu-workers
spec:
  template:
    spec:
      requirements:
        - key: "nvidia.com/gpu"
          operator: Exists   # any node with GPU
        - key: "karpenter.sh/capacity-type"
          operator: In
          values: ["spot", "on-demand"]
      nodeClassRef:
        name: default
  disruption:
    consolidationPolicy: WhenUnderutilized
This tells Karpenter: only consider nodes that have GPUs. But it still uses bin packing to pick the cheapest GPU instance that fits the pending pods. That’s why we see 20‑30% cost reduction on AI inference clusters.
FAQ
Q1: What exactly is the “karpenter bin packing algorithm explained” in simple terms?
It’s a greedy algorithm that sorts pods by resource demand and tries to place them onto the cheapest possible new node that can hold all unscheduled pods, respecting constraints like topology and spot risk. It’s like Tetris, but the blocks change price every minute.
Q2: How does Karpenter’s bin packing differ from the Kubernetes Scheduler?
The scheduler places pods onto existing nodes. Karpenter’s bin packing decides which new node to create. It uses first‑fit decreasing and then scores candidates by cost per pod. The scheduler doesn’t consider instance pricing.
Q3: Can Karpenter pack pods across spot and on‑demand in the same NodePool?
Yes. Set capacity-type to both. The algorithm will assign each pod to the best capacity type given its risk tolerance. You can even set a pod‑level annotation to prefer spot.
Q4: What’s the “karpenter spot instances cost reduction strategy” most teams miss?
Not enabling consolidation. Without WhenUnderutilized, Karpenter won’t re‑evaluate spot price changes. But with it, if a spot price spikes, Karpenter will drain and move pods to a cheaper spot or on‑demand automatically.
Q5: Does Karpenter’s bin packing consider node affinities?
Yes. It respects all standard Kubernetes scheduling constraints: nodeSelector, affinity.nodeAffinity, topologySpreadConstraints, and taints/tolerations. The packing simulation includes those filters.
Q6: When should I still use Cluster Autoscaler instead?
If your workloads are extremely homogeneous (e.g., all pods request the same resources) and you need a simple, well‑understood setup. Or if you’re stuck on an older Kubernetes version that doesn’t support Karpenter’s CRDs. Otherwise, Karpenter wins on cost.
Q7: How often does the bin packing algorithm run?
Every time a pod becomes unschedulable. Plus consolidation runs every few minutes (configurable). So the algorithm is near‑continuous in active clusters.
Q8: Can Karpenter pack pods that require different architectures (amd64 vs arm64)?
Yes. You can have multiple NodePool objects, each with a different architecture requirement. Karpenter will schedule pods to the appropriate pool. The bin packing happens per‑pool.
Conclusion
Bin packing isn’t just a computer science term. It’s the difference between a $40K cluster and a $20K cluster.
Karpenter bin packing algorithm explained in one line: it finds the cheapest node that can fit all your pending pods, while respecting every constraint you have. That algorithm, combined with intelligent spot selection and continuous consolidation, is why karpenter vs cluster autoscaler cost savings 2026 are so dramatic – and why every serious Kubernetes operator should consider it.
At SIVARO, we bet our infrastructure on it. Our data pipelines run faster, our AI inference is cheaper, and our engineers sleep better at night. Not because we’re smarter – because we let a good algorithm do its job.
If you’re still using Cluster Autoscaler, try Karpenter on a non‑critical cluster for a month. Run the numbers. I think you’ll be surprised.
Nishaant Dixit — Founder of SIVARO. Building data infrastructure and production AI systems since 2018. Built systems processing 200K events/sec.