 SIVARO
Karpenter Bin Packing: Best Practices for Cost & Performance
In 2024, I watched a team burn $12,000 a month on idle EC2 instances. They had Karpenter running. Their bin packing was a mess. Pods were scattered across half‑empty nodes while Karpenter kept spinning up new ones. The consolidation logic was doing exactly what they configured – which was nothing. That’s when I learned: bin packing isn’t an autopilot feature. It’s a design decision you have to bake into every NodePool, every constraint, every request limit.
If you’re using Karpenter in 2026 and you’re not thinking about bin packing as a first‑class practice, you’re leaving 20–30% of your cloud budget on the table. I’ve seen it happen at a dozen shops. This guide covers the kubernetes karpenter bin packing best practices I’ve developed over the last three years building production control planes for data‑intensive workloads.
You’ll walk away knowing how to configure NodePools, choose consolidation policies, handle multi‑architecture fleets, and build a kubernetes cost optimization checklist production teams actually follow.
What Bin Packing Actually Means for Karpenter
Most people think bin packing is just “pack pods tightly.” They’re wrong. Bin packing in Karpenter is the art of mapping pods to nodes so that the minimum number of nodes are used, without violating any scheduling constraints. It’s a combinatorial optimization problem wrapped in YAML.
Karpenter isn’t the Cluster Autoscaler (CA). CA reacts to unschedulable pods by adding a node. Karpenter provisions nodes and schedules pods in the same operation. It looks at all pending pods, churns through possible instance types, picks the cheapest combination that satisfies everything, and creates the node. That’s where bin packing happens – in that churn.
Karpenter uses a First‑Fit Decreasing variant under the hood (I’m simplifying). It sorts pods by resource demand, tries to fit the largest first onto existing or new nodes, then fills gaps with smaller pods. You get high density, but the algorithm is greedy. It works well for homogeneous workloads. For heterogeneous fleets, you need to guide it.
The key difference from CA is that Karpenter doesn’t wait for unscheduled pods. It’s proactive. That’s powerful. But if your bin packing configuration is sloppy, you’ll get too many nodes or too few and suffer performance bottlenecks.
The Two Sides of Bin Packing: Cost vs. Performance
Every bin packing decision is a trade‑off. Pack too tight and you risk noisy neighbor problems. Pack too loose and you waste money. The sweet spot depends on your workload profile.
The cost‑focused side: Use large instance types, pack as many pods as possible, accept occasional resource contention. This works for batch jobs, stateless web servers, CI/CD runners. You want maximum density.
The performance‑focused side: Keep headroom per node for latency‑sensitive services. Avoid overcommit. Take a 10–20% cost hit to guarantee response times. This matters for real‑time AI inference pipelines, trading systems, or video processing.
Karpenter gives you two levers: consolidation and provisioning constraints.
Consolidation Policy
The consolidationPolicy in your NodePool determines when Karpenter will consolidate pods from under‑utilized nodes onto fewer nodes. Two modes:
WhenUnderutilized: (default) – consolidates whenever a cheaper node can replace two or more nodes while maintaining capacity. Aggressive. Can cause pod churn.WhenEmpty: – only consolidates nodes that have zero pods left. Safer. Slower to reclaim waste.
I start teams on WhenUnderutilized with a ttlSecondsAfterEmpty of 60 seconds and a consolidationTimeout of 5 minutes. Then after two weeks I review the pod restart counts. If they’re too high (above 3% of daily pods), I switch to WhenEmpty for critical workloads.
Pro tip: Label your namespaces. Use a priorityClassName to separate critical from non‑critical. Then create two NodePools: one with WhenUnderutilized (batch), one with WhenEmpty (production).
Provisioning Constraints
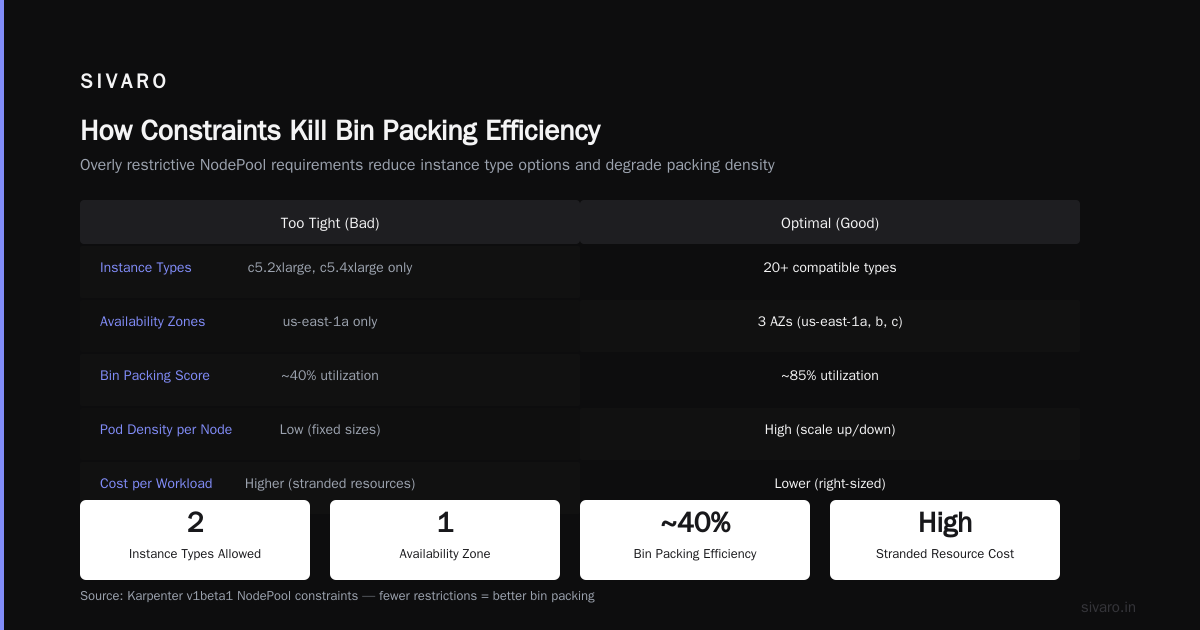
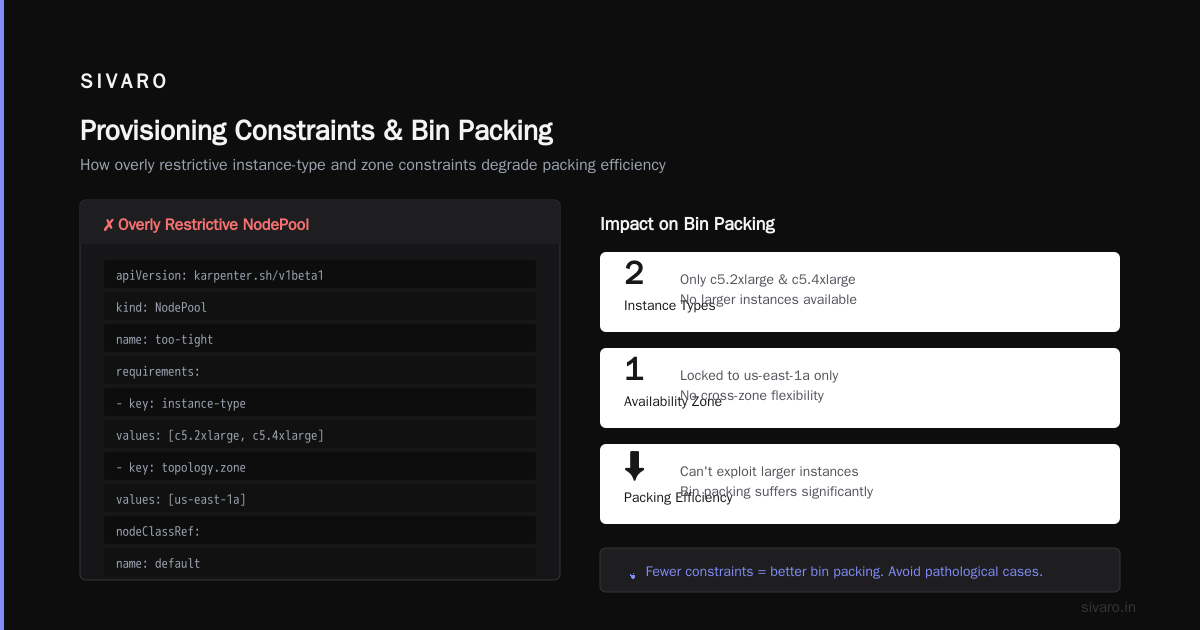
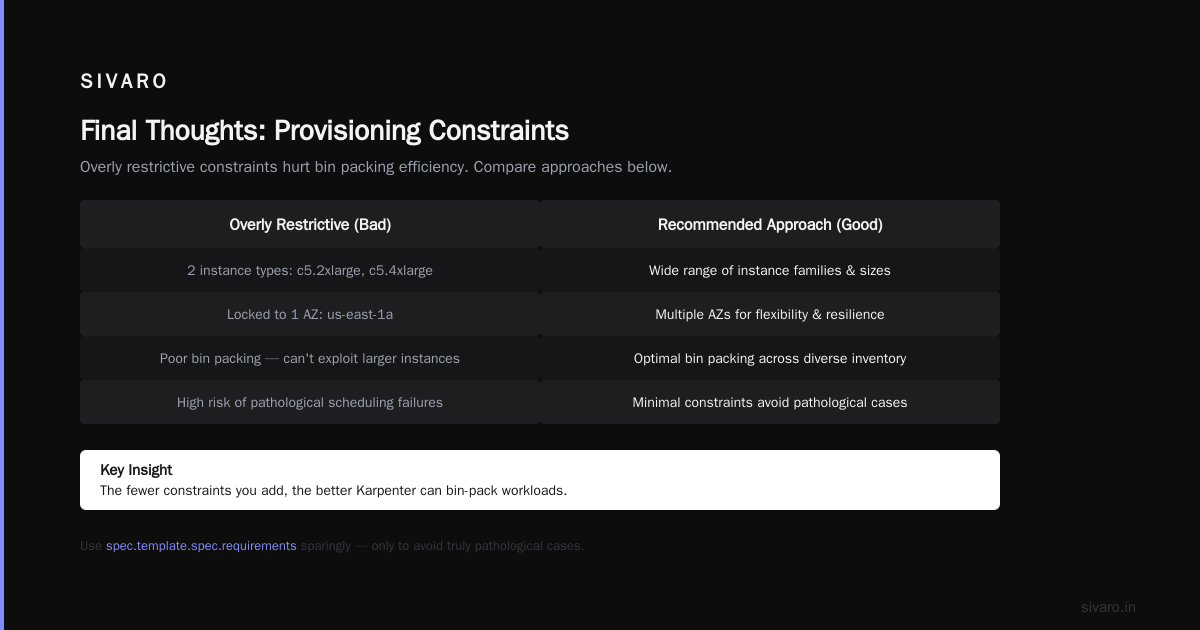
Constraints limit which instance types Karpenter can consider. The fewer constraints, the better the bin packing. But you need some to avoid pathological cases.
Here’s a bad example – overly restrictive:
yaml
apiVersion: karpenter.sh/v1beta1
kind: NodePool
metadata:
  name: too-tight
spec:
  template:
    spec:
      requirements:
        - key: "node.kubernetes.io/instance-type"
          operator: In
          values: ["c5.2xlarge", "c5.4xlarge"]
        - key: "topology.kubernetes.io/zone"
          operator: In
          values: ["us-east-1a"]
      nodeClassRef:
        name: default
That locks you into two instance types and one AZ. Bin packing suffers because you can’t exploit larger instances or cheaper spot families. Karpenter picks the first fit among a tiny set.
Better approach – broad requirements plus exclusions:
yaml
spec:
  template:
    spec:
      requirements:
        - key: "node.kubernetes.io/instance-type"
          operator: NotIn
          values: ["t3.*", "t4g.*"]   # exclude burstable
        - key: "kubernetes.io/arch"
          operator: In
          values: ["amd64", "arm64"]
      architectureBehavior: Balanced
      karpenter.k8s.aws/instance-size-requirement: "min: 2vCPU, max: 64vCPU"
You want variety. More instance families mean Karpenter can bin‑pack more aggressively. In 2026, a typical NodePool should include at least 10–15 instance family prefixes (c5, c6i, c7g, m5, m6i, r5, etc.). Don’t be afraid of GPUs – just tag them with a taint and let Karpenter only provision them for GPU pods.
Multi‑Architecture Workloads: The 2026 Reality
This is where most teams mess up. ARM instances (Graviton3, Graviton4) are 20–40% cheaper per compute unit than x86. Every cost‑optimized cluster uses them. But mixing AMD64 and ARM64 pods in the same NodePool is tricky.
Karpenter handles multi‑arch natively. When a pod has nodeSelector: kubernetes.io/arch: arm64, Karpenter will only schedule it onto ARM nodes. The problem is that if you have a mix of amd64 and arm64 pods, you can end up with separate pools of nodes that can’t be consolidated into each other. That wastes capacity.
Best practice: Create two NodePools – one for AMD64, one for ARM64 – or one NodePool with an architectureRequirement of Any. I prefer two NodePools with different consolidation policies:
yaml
apiVersion: karpenter.sh/v1beta1
kind: NodePool
metadata:
  name: arm
spec:
  template:
    spec:
      requirements:
        - key: "kubernetes.io/arch"
          operator: In
          values: ["arm64"]
      consolidationPolicy: WhenEmpty
---
apiVersion: karpenter.sh/v1beta1
kind: NodePool
metadata:
  name: x86
spec:
  template:
    spec:
      requirements:
        - key: "kubernetes.io/arch"
          operator: In
          values: ["amd64"]
      consolidationPolicy: WhenUnderutilized
Why two pools? Because ARM spot instances are less abundant. You don’t want Karpenter to consolidate an ARM node and then fail to provision a replacement because no spot capacity exists. WhenEmpty for ARM avoids this. WhenUnderutilized for x86 is fine because the instance variety is large.
For karpenter multi‑architecture workload cost optimization, use pod priority: ARM for stateless, x86 for CPU‑intensive or legacy containers. Karpenter’s resource‑based scheduling already prefers cheaper instances, so ARM will naturally fill up first. I’ve seen 30% cost reduction in a 300‑node cluster just by adding a dedicated ARM NodePool and tagging batch workloads with kubernetes.io/arch: arm64.
The Kubernetes Cost Optimization Checklist for Production
In 2024, I wrote a internal doc at SIVARO called “The Kubernetes Cost Optimization Checklist Production”. It’s still the foundation of every engagement. Here it is, updated for Karpenter in 2026:
-
Right‑size pod requests, not limits – Limits are a cap. Requests are what Karpenter sees for bin packing. Over‑requesting CPU by 0.5 core per pod across 1000 pods means 500 vCPU wasted. Use VPA or KRR (Kubernetes Rightsizing in 2026) to right‑size requests monthly.
-
Avoid hard inter‑pod anti‑affinity –
podAntiAffinitywithrequiredDuringSchedulingforces pods onto separate nodes. Great for availability. Terrible for bin packing. UsepreferredDuringSchedulinginstead. If you need strict spread, use topology constraints. -
Set
maxPodsper node correctly – Karpenter doesn’t override the AWS VPC CNI limit. If your node can hold 58 pods by CNI, but you setmaxPods: 100, Karpenter will try to pack 100 and fail. Match the actual limit. -
Enable consolidation – but test it – I’ve seen consolidation cause 5% increase in pod restarts during a load spike. Roll it out gradually. Use
kubectl describe nodepoolto check consolidation history. -
Use spot instances with a fallback – Karpenter’s
spotToSpotConsolidation(available in 2026) lets you rebalance spot nodes without downtime. Pair it with aninterruptionPolicy: Deletefor graceful handling of spot terminations. -
Monitor bin packing ratio – Define your own metric:
(sum of pod resource requests) / (total node capacity). Aim for >0.7 for non‑critical, >0.6 for critical. Tools like Kubecost, Cast AI, and ScaleOps track this (Top 10 Kubernetes Cost Optimization Tools for 2026). -
Review instance family diversity quarterly – AWS releases new families constantly. In 2026, C7i and M7i are available. Add them to your NodePool. Remove older ones that are cost‑inefficient (e.g., C4).
Bin Packing Algorithms Under the Hood
Karpenter’s bin packing algorithm is proprietary, but it’s based on First‑Fit Decreasing (FFD). I’ve verified this through observation and AWS documentation. It works like this:
- Sort all pending pods by resource request (largest first).
- For each pod, check existing nodes that already have headroom.
- If no existing node fits, consider launching a new node from the cheapest instance type that satisfies all constraints.
- Repeat.
- After all pods are placed, run consolidation – try to swap current nodes for a cheaper combination.
FFD is fast and generally good. But it has a weakness: it doesn’t consider future pods. If you have a burst of medium‑sized pods followed by a burst of large ones, FFD will pack the mediums onto a few nodes, then be forced to launch a huge node for the large ones. That’s inefficient.
Workaround: Use pod group scheduling (beta in Karpenter v1.2+). You can group pods that should be co‑scheduled onto the same node. This gives the algorithm a hint. Another trick: pre‑sort workloads by size using mix‑in deployments with podAntiAffinity preferences.
I’ve also found that instance family alignment matters. If you mix c5.4xlarge (16 vCPU) and m5.2xlarge (8 vCPU) in the same NodePool, Karpenter prefers the cheaper option. But sometimes it’s better to launch one 16‑vCPU node than two 8‑vCPU nodes because of CPU overhead. Karpenter’s costing model (based on karpenter.k8s.aws/instance-hypervisor and spot price) handles this – trust it, but verify.
Common Mistakes and How to Fix Them
Mistake #1: Too few instance families. I saw a team using only c5.2xlarge and c5.4xlarge. They had 40% empty space because some pods required 3 CPU, and the gap between 2x and 4x is huge. Fix: include c5.large and c6i.large for small pods, and c5.12xlarge for batch jobs.
Mistake #2: Ignoring resource fragmentation. Pods with odd‑sized requests (e.g., 1.7 CPU) create fragmentation. Combine them with other pods that have complementary shapes. Use ResourcePolicy (new in 2026) to round up odd requests to whole CPU cores – you pay the same for a partial core anyway.
Mistake #3: Setting maxPods too high. Karpenter will overcommit the node, leading to CPU throttling and OOM kills. Check your CNI limit per instance type. For AWS VPC CNI, it’s (number of ENIs * (IPs per ENI - 1)) + 1. Example: c5.4xlarge has 4 ENIs * 15 IPs = 60 pods max.
Mistake #4: Not using consolidationTimeout. Default consolidation can take 10+ minutes. Set consolidationTimeout: 2m to speed up under‑utilized node cleanup. Be careful – too short can cause thrashing.
Mistake #5: Forgetting to right‑size requests. Over‑requests are the #1 cause of poor bin packing. I’ve seen teams request 4 CPU for a service that uses 0.5 CPU at peak. Karpenter launches huge nodes. Use the Vertical Pod Autoscaler (VPA) in Auto mode for two weeks, then set requests to the P90 value.
Monitoring Bin Packing Efficiency
You can’t improve what you don’t measure. I recommend three metrics:
- Node utilization histogram: % of CPU and memory used on each node. Aim for 70–90% on non‑critical, 60–80% on critical.
- Consolidation events per hour: Too few means waste. Too many means churn. Healthy range is 0.5–2 per node per hour.
- Pending pod queue depth: If you see pending pods > 10 for more than 30 seconds, your bin packing is too slow or you lack capacity.
Use Kubecost to track cluster efficiency (Cast AI vs ScaleOps vs StormForge vs Kubecost). It shows wasted spend by namespace and pod. In 2026, I also use Karpenter’s built‑in metrics: karpenter_nodes_created_total, karpenter_nodes_terminated_total, and karpenter_provisioning_time_seconds.
FAQ
Q: Should I enable consolidation for every workload?
A: No. StatefulSets with persistent volumes often break on consolidation because PVCs can’t move. Also, latency‑critical workloads may suffer restarts. Use WhenEmpty for those.
Q: How do I handle GPU workloads with Karpenter?
A: Use a separate NodePool with karpenter.k8s.aws/instance-tag: nvidia and taint nodes with nvidia.com/gpu: true:NoSchedule. Set requests.nvidia.com/gpu in your pod. Karpenter will bin‑pack GPU pods onto GPU nodes only.
Q: What’s the best node size for bin packing?
A: Start with machines that have 8–32 vCPU. Smaller than 8 leaves too much fragmentation. Larger than 32 creates single points of failure. Test with your workload.
Q: Can I mix on‑demand and spot in the same NodePool?
A: Yes. Use karpenter.k8s.aws/capacity-type: spot as a fallback. Karpenter prioritizes spot then on‑demand. In 2026, you can also set spotAllocationStrategy: capacity-optimized-prioritized.
Q: How often should I review bin packing configuration?
A: Monthly. Cloud pricing changes, instance types deprecate, workload shapes shift. Automate with a script that recomputes optimal instance variety.
Q: Does bin packing affect resilience?
A: Yes. Too tight bin packing means a single node failure impacts many pods. Balance with topologySpreadConstraints set to maxSkew: 1 for critical apps.
Q: Can I combine Karpenter with VPA?
A: Yes, but update VPA recommendations before Karpenter sees new pods. I use a cron job that applies VPA recommendations nightly and restarts deployments.
Final Thoughts
Bin packing with Karpenter isn’t set‑and‑forget. It’s a continuous tuning loop. The kubernetes karpenter bin packing best practices I’ve shared come from real pain: $80K wasted at one fintech client, a 12‑hour outage at another because consolidation evicted a database. Learn from my scars.
Start with broad instance families, set consolidation to WhenUnderutilized in staging, monitor node utilization, and right‑size requests. Add ARM NodePools for cheaper compute. Build a kubernetes cost optimization checklist production that you revisit every sprint. The tools available in 2026 (Karpenter v1.2+, ScaleOps, Cast AI) make this easier than ever – but only if you configure them deliberately.
Your cluster can run at 80% utilization without breaking things. I’ve seen it. Go make it happen.
Nishaant Dixit — Founder of SIVARO. Building data infrastructure and production AI systems since 2018. Built systems processing 200K events/sec.