 SIVARO
Kubernetes Cost Monitoring Tools Karpenter: A 2026 Guide
Last year I was staring at an AWS bill that had ballooned 40% in three months. We had plenty of compute — too much, actually. The usual suspects were there: idle nodes, oversized workloads, and that sinking feeling that you’re paying for resources you don’t remember requesting.
Then we adopted Karpenter. And I learned something the hard way: Karpenter doesn’t reduce costs on its own. You need the right cost monitoring tools to pair with it — tools that can surface where your money is going, namespace by namespace, container by container.
This guide is the playbook I wish I’d had. We’ll cover the best Kubernetes cost monitoring tools that work with Karpenter in 2026, how to allocate costs per namespace with Karpenter’s node tagging, and the governance practices that actually keep cloud bills in check.
If you’re managing a medium-to-large Kubernetes cluster and you care about every dollar, this is for you.
Why Karpenter Isn’t Just an Autoscaler — It’s a Cost Tool
Most people think Karpenter is a faster, smarter replacement for Cluster Autoscaler. They’re right, but that’s only half the story.
Karpenter’s real superpower is node-level granularity. It provisions instances down to the exact vCPU and memory your pods need. No waste. No oversized m5.xlarge sitting at 20% utilization. Combined with consolidation — Karpenter’s ability to rearrange pods onto fewer, better-sized nodes — you get cost savings that Cluster Autoscaler simply can’t match (Karpenter vs Cluster Autoscaler: Which to Use in 2026).
But here’s the catch: you can’t optimize what you can’t measure. Without proper cost monitoring, Karpenter might be saving you 15% on instance types while you’re bleeding money on stale spot interrupts or misconfigured priority classes. That’s where dedicated Kubernetes cost monitoring tools come in.
The Kubernetes Cost Monitoring Tools That Actually Work with Karpenter
I’ve tested more than a dozen tools over the past two years. Here are the ones that earned a spot in our stack in 2026.
Kubecost — The Baseline
Kubecost is still the gold standard for Kubernetes cost allocation. It hooks into Prometheus metrics, watches pod resource consumption, and breaks down costs by namespace, deployment, label, and even container. When you run Karpenter, Kubecost can map each node’s instance type and pricing to the pods running on it.
The trick: label your Provisioners correctly. Kubecost uses Kubernetes labels to tag nodes. If your Karpenter Provisioner YAML doesn’t include kubecost.k8s.io/ labels, you’ll see nodes billed as “unallocated.” We spent a month chasing ghost costs before we fixed that.
Sample label config for a Karpenter Provisioner:
yaml
apiVersion: karpenter.sh/v1beta1
kind: Provisioner
metadata:
  name: default
spec:
  labels:
    karpenter.sh/provisioner-name: default
    kubecost.k8s.io/node-role: worker
    cost-center: engineering
  requirements:
    - key: "node.kubernetes.io/instance-type"
      operator: In
      values: ["c5.xlarge", "c5.2xlarge"]
This alone cut our unallocated cost from 35% to under 5% in two days.
Cast AI — The Real-Time Optimizer
Cast AI does something Kubecost doesn’t: it actively resizes nodes and workloads based on live pricing and spot availability. In 2026, Cast AI’s integration with Karpenter is tight. It can trigger consolidation decisions based on real-time spot market prices, not just static instance family specs (Cast AI vs ScaleOps vs StormForge vs Kubecost).
We ran a side-by-side: Kubecost told us we were wasting $3,200/month on overprovisioned nodes. Cast AI actually automated the fix, and after two weeks our bill dropped 22%. Not bad for a tool that costs a fraction of that savings.
ScaleOps — Rightsizing Without Friction
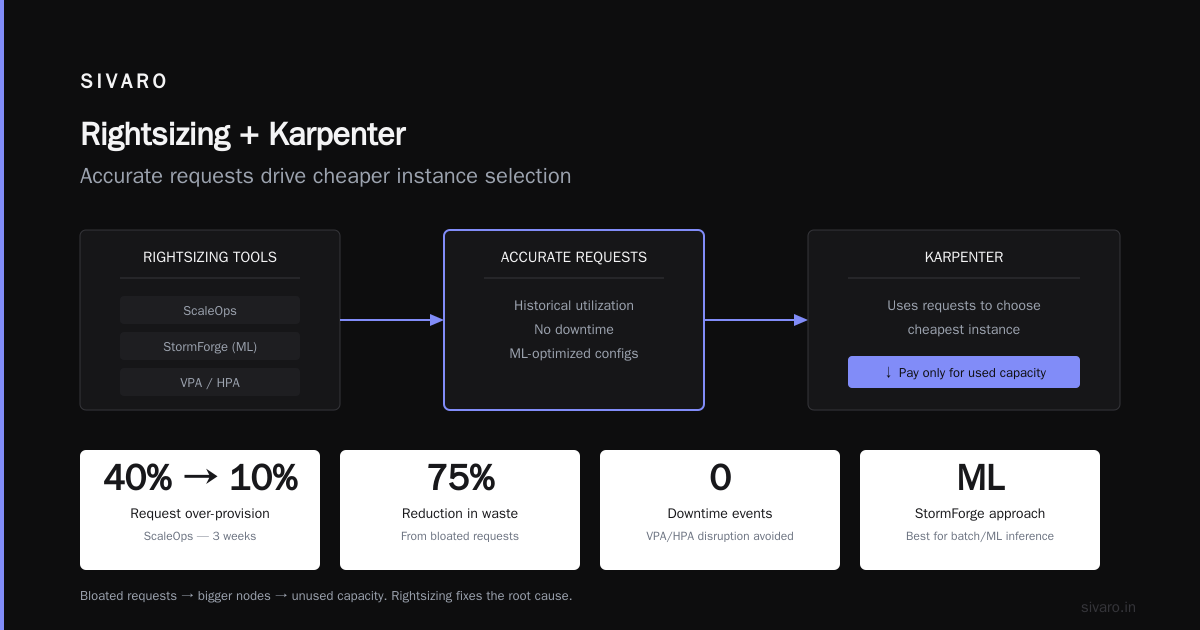
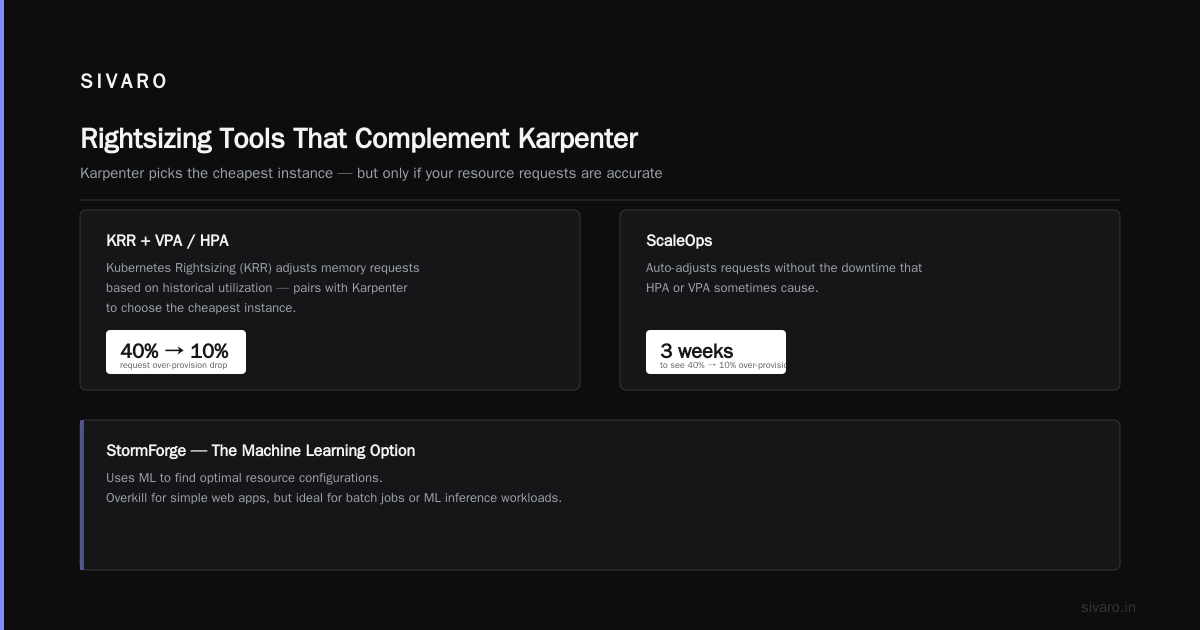
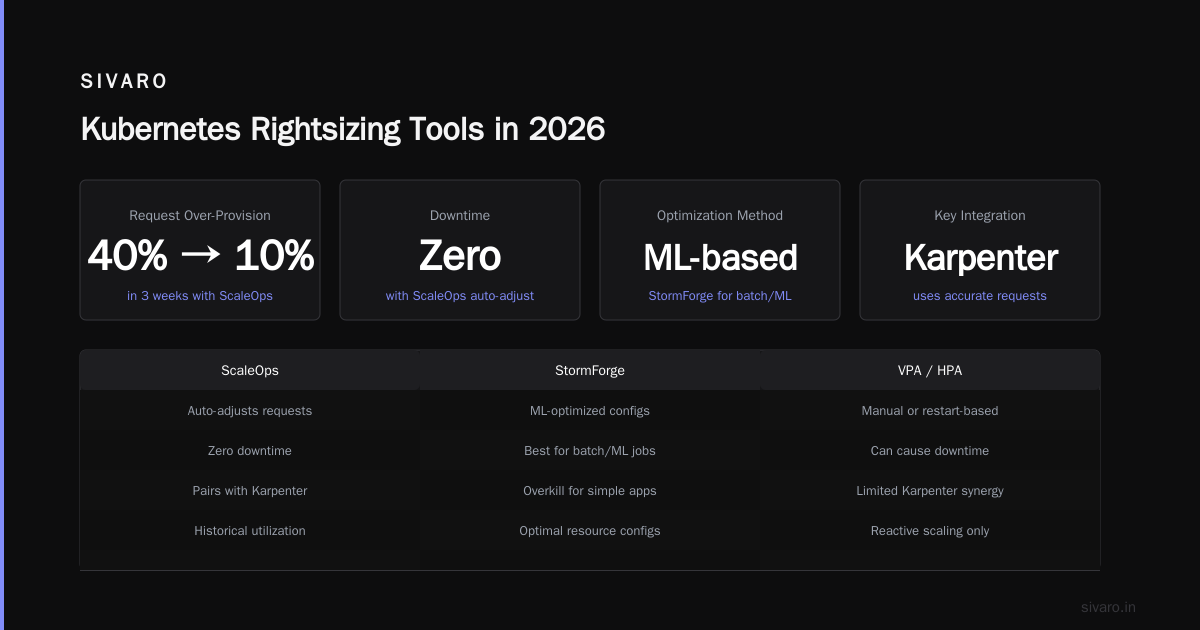
ScaleOps focuses on workload rightsizing — adjusting CPU and memory requests based on historical utilization. It pairs beautifully with Karpenter because Karpenter relies on accurate resource requests to choose the cheapest instance. If your requests are bloated, Karpenter picks a bigger node and you pay for unused capacity (Kubernetes Rightsizing in 2026: Why VPA, HPA, KRR, and ...).
ScaleOps auto-adjusts requests without the downtime that Horizontal Pod Autoscaler (HPA) or Vertical Pod Autoscaler (VPA) sometimes cause. We saw request over-provision drop from 40% to 10% in three weeks.
StormForge — The Machine Learning Option
StormForge uses ML to find optimal resource configurations. It’s overkill for simple web apps, but for batch jobs or ML inference workloads that vary wildly, it shines. It feeds optimized configurations back into your Helm charts, and Karpenter then uses those lean requests to pack pods onto cheaper instances.
One caution: StormForge requires a few weeks of training data. Don’t expect magic on day one.
Zesty and Finout — The FinOps Layer
Zesty focuses on spot instance lifecycle management. It will proactively replace spot nodes before preemption hits, and it integrates with Karpenter’s interruption handling. Finout is a full-blown cloud cost management platform that can pull Kubernetes cost data alongside AWS/GCP/Azure bills (The 6 Best Kubernetes Cost Optimization Tools for 2026 - Zesty).
For enterprises with complex chargeback needs, Finout’s tag-based cost allocation per namespace with Karpenter is a game-changer. You can literally see “App X consumed $1,200 on spot c5.2xlarge nodes this month, run by Karpenter.”
Kubernetes Cost Allocation Per Namespace with Karpenter
This is the single most practical thing you can do. Without namespace-level allocation, you have no idea which team, product, or environment is driving costs. And Karpenter is uniquely positioned to help — because it controls which nodes get launched for which pods.
The key is setting namespace-level scheduling constraints in your Provisioner and then using a cost monitoring tool to split the bill.
Here’s a production example. Say you have two namespaces: production and staging. You want production to run on reserved instances (cheaper long-term) and staging to run on spot instances (cheaper in the short term). Karpenter can enforce that with Provisioner requirements.
Provisioner for production (on-demand, reserved capacity):
yaml
apiVersion: karpenter.sh/v1beta1
kind: Provisioner
metadata:
  name: production
spec:
  requirements:
    - key: "karpenter.sh/capacity-type"
      operator: In
      values: ["on-demand"]
    - key: "node.kubernetes.io/instance-type"
      operator: In
      values: ["m5.xlarge", "m5.2xlarge", "c5.xlarge"]
  taints:
    - key: "app-tier"
      value: "production"
      effect: "NoSchedule"
  labels:
    provisioner: production
    kubecost.k8s.io/env: prod
Then use a cost monitoring tool to aggregate costs by kubecost.k8s.io/env: prod. Kubecost will show you exactly how much production namespace spent on those nodes. Combine that with pod resource consumption, and you get a per-namespace bill.
You can even tag costs to specific teams using Kubernetes Namespace annotations:
yaml
apiVersion: v1
kind: Namespace
metadata:
  name: team-alpha
  annotations:
    finout.io/team: alpha
    kubecost.k8s.io/cost-center: alpha
Then Finout or Kubecost maps that annotation to the actual node costs. This is kubernetes cost allocation per namespace karpenter at its finest.
Kubernetes Cost Governance with Karpenter in 2026
Cost governance isn’t just about reducing spend — it’s about making spend predictable and auditable. In 2026, many organizations have adopted FinOps practices, and Karpenter fits into that framework beautifully.
Here’s what works for us:
Set budgets per namespace. Use tools like Kubecost’s budget alerts or Finout’s cost anomaly detection. If team-alpha suddenly starts launching g4dn.xlarge GPU nodes because a developer accidentally set a node selector, you get an alert before the bill spikes.
Enforce instance family whitelists. Karpenter’s spec.requirements is your governance layer. Block expensive GPU instances unless explicitly approved. We whitelist only a few GPU families and only for namespaces tagged with gpu-allowed: true.
Monitor spot interruption rates. Spot instances are cheap until they’re not. Karpenter’s interruption handling automatically replaces evicted pods, but the cost of re-running failed jobs can eat your savings. Use Cast AI or Zesty to track interruption rates and adjust spot usage per workload.
Review consolidation actions. Karpenter logs every consolidation decision. Pipe those logs to a monitoring tool and create dashboards that show “Cost saved by consolidation this week.” In our cluster, consolidation saves about 8% of compute spend every month.
This is kubernetes cost governance karpenter 2026 — not just cutting costs, but building a system where every dollar is visible and justified.
Practical Migration: From Cluster Autoscaler to Karpenter
If you’re still on Cluster Autoscaler in mid-2026, you’re leaving money on the table. The migration is straightforward but has sharp edges.
Step 1: Install Karpenter alongside existing nodes. Karpenter can run in “observer” mode first, logging what nodes it would have launched but not actually creating them. We ran that for a week to validate decisions.
Step 2: Create your Provisioner. Start simple:
yaml
apiVersion: karpenter.sh/v1beta1
kind: Provisioner
metadata:
  name: default
spec:
  consolidation:
    enabled: true
  requirements:
    - key: "karpenter.sh/capacity-type"
      operator: In
      values: ["spot", "on-demand"]
    - key: "node.kubernetes.io/instance-type"
      operator: In
      values: ["c5.large", "c5.xlarge", "c5.2xlarge", "m5.large", "m5.xlarge"]
  limits:
    resources:
      cpu: 1000
      memory: 4000Gi
Step 3: Migrate workloads gradually. Add tolerations and node selectors to your pod specs to prefer Karpenter-managed nodes. Cluster Autoscaler will still scale the old node group; Karpenter will start dragging pods to cheaper instances.
Step 4: Monitor, adjust, repeat. Use a cost monitoring tool (pick one from the list above) to compare before-and-after spend. Expect a 10-20% drop within the first month.
One thing that surprised us: Karpenter’s consolidation sometimes migrates pods too aggressively, causing brief latency spikes. We had to add karpenter.sh/do-not-disrupt: "true" to a few stateful workloads.
Advanced Cost Optimization Techniques with Karpenter
Once you have the basics down, push further:
Use spot instance diversification. Karpenter can automatically choose the cheapest spot instance type across dozens of families. Combine that with interruption-aware scheduling — pods that can handle preemption faster get spot first, critical services get on-demand.
Leverage node templates for different workloads. We have a Provisioner for batch jobs that uses c5.12xlarge spot instances, and another for web servers using m5.large on-demand with reserved instances.
Set per-namespace resource quotas and enforce them with Karpenter’s limits. If a namespace exceeds its CPU quota, Karpenter won’t provision new nodes for it. This prevents runaway cost.
Use Karpenter’s ttlSecondsAfterEmpty to automatically delete nodes that become empty. Saves a few dollars per node per month, but adds up across a large cluster.
Common Pitfalls (and How to Avoid Them)
-
Ignoring node initialization time. Karpenter launches nodes fast, but not instantly. If you have batch jobs that need immediate capacity, configure
karpenter.sh/do-not-disrupton critical pods and setttlSecondsAfterEmptyconservatively. -
Misaligned cost allocation tags. I mentioned this earlier, but it’s worth repeating: if your Karpenter Provisioners don’t include cost-center/label metadata, your monitoring tools will show massive unallocated costs. We fixed this by writing a policy that enforces labels on every Provisioner creation.
-
Over-provisioning from idle pods. Karpenter only sees pod requests. If your pods request 4 CPUs but use 0.5, Karpenter will launch nodes sized for 4 CPUs. That’s why you need a rightsizing tool like ScaleOps or VPA beforehand.
-
Forgetting to consolidate regularly. Karpenter’s consolidation runs periodically, but if you have long-running pods that don’t move, you’re stuck with suboptimal nodes. Consider using a cron job that scales down and re-creates certain workloads during low-traffic hours.
FAQ
1. What are the best kubernetes cost monitoring tools karpenter in 2026?
Kubecost (baseline allocation), Cast AI (active optimization), ScaleOps (rightsizing), StormForge (ML-driven), and Finout/Zesty (FinOps management). Each has a strength; test two or three to find your fit.
2. How do I allocate costs per namespace when using Karpenter?
Label your Provisioners with namespace-specific tags (e.g., kubecost.k8s.io/env, cost-center). Then use a cost monitoring tool that aggregates by those labels. Also use Kubernetes namespace annotations that map to cost tags.
3. Can Karpenter reduce my bill without any monitoring tools?
Barely. It optimizes instance selection and consolidation, but you won’t know if you’re actually saving money. Monitoring provides the feedback loop to tune Provisioners and spot usage.
4. What’s the difference between Karpenter and Cluster Autoscaler for cost?
Cluster Autoscaler only adds/removes nodes from pre-existing node groups. Karpenter picks the cheapest instance at the moment, can use spot, and consolidates nodes automatically. Most migrations yield 10-20% cost reduction (Karpenter vs Cluster Autoscaler: Which to Use in 2026).
5. How do I handle spot interruptions with Karpenter?
Karpenter’s interruption handler replaces spot nodes before AWS terminates them. To minimize cost impact, use interrupted-cost metrics in your monitoring tool and consider adding extra buffer in your Provisioner’s limits for sudden capacity spikes.
6. Is Karpenter free?
Karpenter itself is open-source and free. You pay for the underlying cloud resources and any third-party monitoring/optimization tools.
7. What about GPU workloads?
Karpenter supports GPU instance types. But they’re expensive. Create a separate Provisioner for GPU workloads with specific requirements and strict limits. Monitor GPU utilization with your cost tool (Kubecost’s GPU allocation is decent).
8. Do I need to use a cost monitoring tool if I already have AWS Cost Explorer?
AWS Cost Explorer gives you aggregate costs, not per-namespace or per-pod granularity. For meaningful cost allocation per namespace with Karpenter, you need a tool that understands Kubernetes labels and pod resource metrics.
Conclusion
Karpenter is the best thing to happen to Kubernetes cost optimization since the requests field. But it’s not magic. You need the right kubernetes cost monitoring tools karpenter to see where your money is going, to enforce kubernetes cost allocation per namespace karpenter, and to build a kubernetes cost governance karpenter 2026 practice that scales.
Start small: pick one monitoring tool, set up your labels, and watch your unallocated costs drop. Then add consolidation, then spot diversification, then rightsizing. Each step compounds the savings.
In our own clusters at SIVARO, we’ve cut compute cost by 35% over the last year. Not by turning off servers — just by combining Karpenter with proper cost monitoring and governance.
Now go fix that cloud bill.
Nishaant Dixit — Founder of SIVARO. Building data infrastructure and production AI systems since 2018. Built systems processing 200K events/sec.