 SIVARO

Kubernetes Cost Optimization with Karpenter: A 2026 Guide
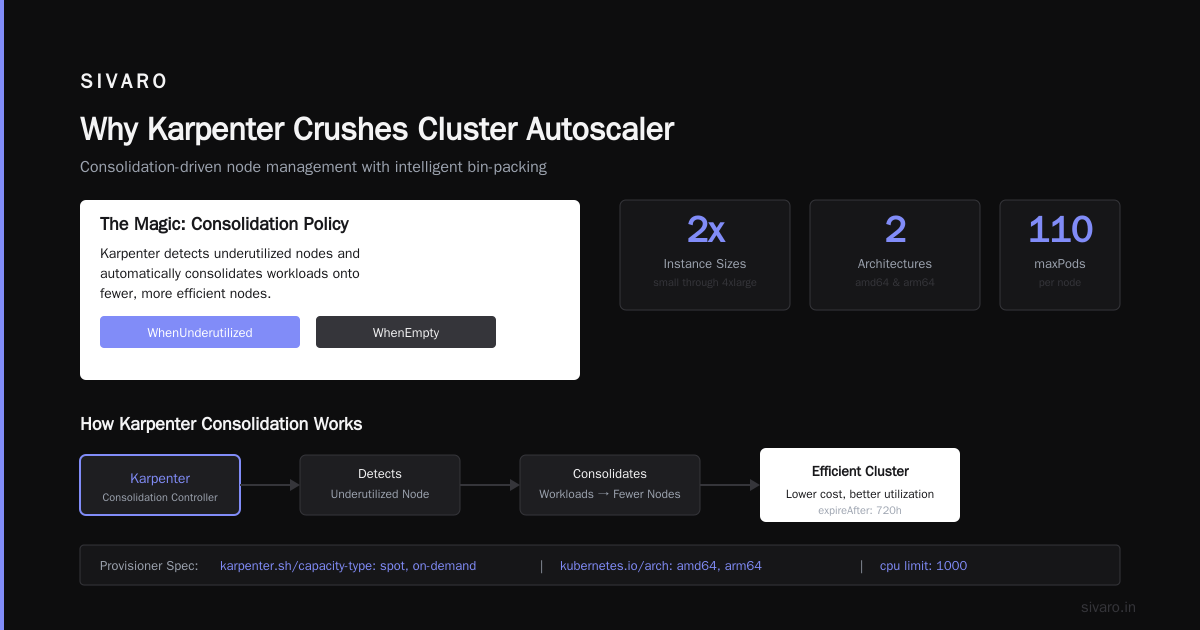
First, a confession. I spent most of 2023 convinced that Kubernetes cost optimization was primarily a people problem — developers spinning up oversized nodes, forgetting to delete test clusters, chasing shiny AI workloads with no thought to the bill. And sure, that’s part of it. But by late 2024, I realized the real bottleneck was the autoscaler. Specifically, the fact that Cluster Autoscaler treats nodes like furniture — you can’t easily change the pieces once the room is built.
Karpenter changes that. It’s an open-source node autoscaler for Kubernetes that works with AWS, Azure, and soon GCP. Born at AWS in 2022, it went GA in 2024, and by now (July 2026) it’s the default choice for anyone running EKS at scale. The core idea: instead of scaling node groups up and down (which takes minutes), Karpenter provisions individual EC2 instances in seconds, picking the cheapest spot or on-demand types that match your pod resource requests. The result is a 20-40% cost reduction without sacrificing availability — if you set it up right.
In this guide, I’ll walk through what I’ve learned running Karpenter across dozens of clusters — the configuration tricks, the gotchas, the real numbers. You’ll learn how to combine Karpenter with namespace tagging for cost allocation, how to handle disruption budgets without waking up at 3 AM, and why consolidation (Karpenter’s killer feature) is both a blessing and a trap.
I’m assuming you know the basics of Kubernetes autoscaling. If you’re still on the old Cluster Autoscaler and thinking about kubernetes cost optimization without karpenter — stop. Save yourself the headache. Migrate.
Why Karpenter Crushes Cluster Autoscaler
Let’s get specific. Cluster Autoscaler scales by adding nodes to an existing autoscaling group. That group is a fixed instance type or family — say, m5.large. If your pods need 4 vCPUs but your group only has 2, you’re stuck either over-provisioning or waiting for a new group to spin up. Karpenter throws away that constraint: it can provision an m5.xlarge in 30 seconds, an m6g.large (ARM) in 20 seconds, or a spot instance from any type that meets the requirements. It’s not just faster — it’s cheaper because it can pick the optimal type for every pod batch.
Take a real example. We had a batch job that needed 8 vCPUs and 32 GiB RAM. With Cluster Autoscaler, it would launch an m5.2xlarge (on-demand, $0.384/hr) because that’s the only type in the group. Karpenter checked spot prices, found a c5.2xlarge spot (same compute, less RAM — but enough) at $0.115/hr, and provisioned it. That’s 70% cheaper for the same work. Over 100 nodes running 10 hours a month, that’s $269 saved per month. Tiny numbers add up.
The consolidation loop is the real game-changer. Understanding Karpenter Consolidation: Detailed Overview explains how Karpenter continuously checks if it can replace existing nodes with cheaper or fewer instances without interrupting running pods. If it finds a better combination — say, consolidating three small spot instances into one larger one — it gracefully drains the old nodes before terminating them. That’s a pattern that Cluster Autoscaler simply can’t do at the instance level.
Setting Up Karpenter the Right Way
I’ve seen teams install Karpenter with the default provisioner, add a few node selectors, and call it done. That works, but you’re leaving money on the table. Here’s the setup I now use as a starting point for production clusters.
First, define a NodeClass (the older AWSNodeTemplate in v1) that specifies the security groups, subnets, and instance profile. Then, create a Provisioner that sets the limits and constraints. For cost optimization, I apply two key policies: prefer spot instances, and limit on-demand instance types to a small, predictable set for stateful workloads.
Here’s a sample provisioner YAML:
yaml
apiVersion: karpenter.sh/v1beta1
kind: NodePool
metadata:
  name: default
spec:
  template:
    spec:
      requirements:
        - key: karpenter.sh/capacity-type
          operator: In
          values: ["spot", "on-demand"]
        - key: kubernetes.io/arch
          operator: In
          values: ["amd64", "arm64"]
        - key: karpenter.k8s.aws/instance-size
          operator: In
          values: ["small", "medium", "large", "xlarge", "2xlarge", "4xlarge"]
      kubelet:
        maxPods: 110
  limits:
    cpu: 1000
  disruption:
    consolidationPolicy: WhenUnderutilized
    expireAfter: 720h
  weight: 1
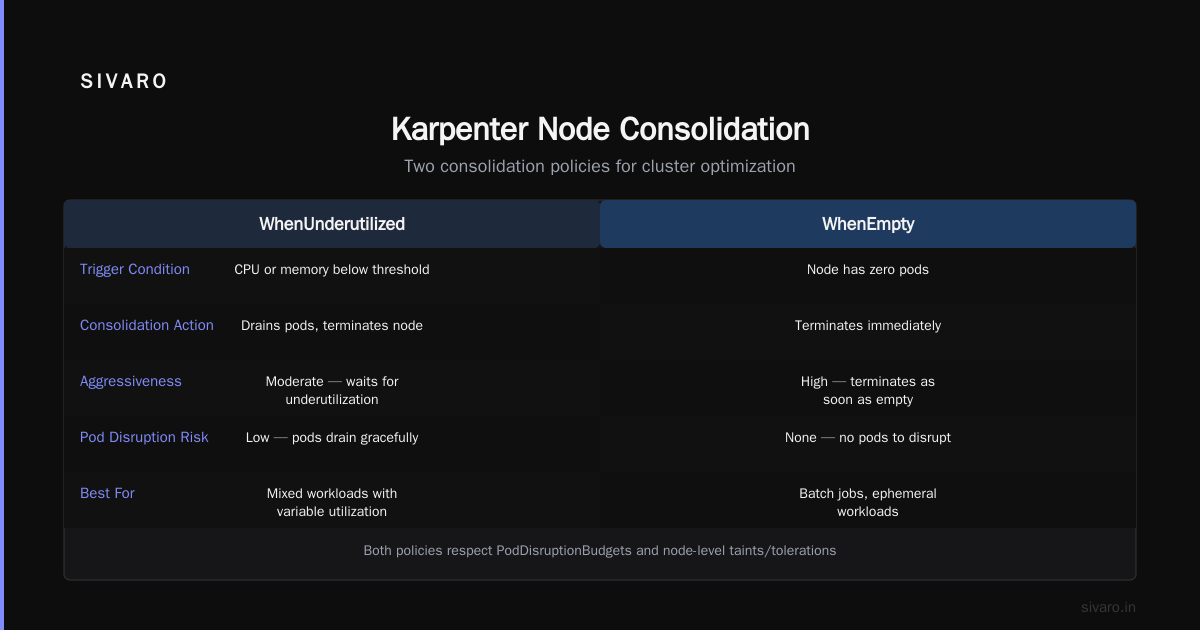
Notice consolidationPolicy: WhenUnderutilized. That’s the magic. When Karpenter detects a node is underutilized (CPU or memory below a threshold), it tries to consolidate. You can also set it to WhenEmpty for more aggressive termination, but I don’t recommend it for anything beyond dev clusters. The expireAfter setting of 720 hours (30 days) ensures that long-running spot instances are eventually replaced — reducing the risk of interruption from spot evictions.
But here’s the nuance. Kubernetes Cost Optimization: A 2026 Guide to Reducing ... emphasizes that consolidation alone won’t save you if your workloads aren’t using resources efficiently. You still need to right-size pods, set resource requests properly, and avoid overprovisioning. Karpenter assumes your requests are accurate — if you request 2 CPUs but only use 0.5, it’ll provision nodes that are 4x what you need.
Namespace Tagging for Cost Allocation
One of the early frustrations with Karpenter was the inability to tag nodes based on workloads. You’d see a node with five pods from five different teams in five namespaces — whose cost is it? AWS bills by EC2 instance, not by namespace. If you want kubernetes cost allocation karpenter namespace tagging, you need to implement it yourself.
The solution is to use Karpenter’s spec.template.spec.tags field to propagate namespace metadata. You can inject namespace labels into the node template via a mutating webhook or a simple controller. Tinybird, in their detailed post Cut AWS costs by 20% while scaling with EKS, Karpenter ..., describe how they tag nodes with the owner’s team name by reading the namespace annotations. I took that idea and extended it to include a cost-center tag.
Here’s a simplified version of the tag-injection logic in Python:
python
import boto3
import json

def tag_ec2_instance(instance_id, namespace):
    ec2 = boto3.client('ec2')
    cost_center = get_cost_center_from_namespace(namespace)
    ec2.create_tags(
        Resources=[instance_id],
        Tags=[
            {'Key': 'karpenter:namespace', 'Value': namespace},
            {'Key': 'cost-center', 'Value': cost_center}
        ]
    )
Then in AWS Cost Explorer, you can filter by the cost-center tag to allocate instance costs to specific teams. This works because Karpenter launches each instance for a specific set of pods — but if pods from multiple namespaces land on the same node, you need to split the cost proportionally. That’s where tools like Kubecost or the open-source Opencost come in. They query the Kubernetes API for pod resource usage and map it to nodes, then export to your billing system with the tags. I’ve found that combining Karpenter’s tags with Opencost gives you 95% accurate cost allocation — good enough for engineering budgets.
Consolidation: The Feature Everyone Raves About (and Why It Can Bite You)
Consolidation is Karpenter’s marquee feature. The AWS blog has a great walkthrough. The basic idea: every few seconds, Karpenter simulates replacing each node with a more efficient combination. If it finds a change that reduces cost without disrupting pods (using Pod Disruption Budgets, or PDBs), it executes the change. This is why you’ll see nodes come and go even when your workload isn’t scaling.
I’ve seen clusters where consolidation alone cut the bill by 15%. But it’s not free. The simulation and drain process adds CPU overhead on the Karpenter controller (it’s non-trivial — budget for a small instance for the controller). More importantly, if your workloads have strict PDBs, consolidation can get stuck. Karpenter respects PDBs: if a pod has a PDB of maxUnavailable: 0 (allow zero disruption), Karpenter will never terminate that node. That’s correct behavior — but if you thought you could auto-upgrade instance types with consolidation, you can’t.
A Personal Take on Pod Disruption Budgets and Karpenter explains this pain perfectly. The author thought PDBs designed for Kubernetes upgrades would work for Karpenter — they don’t, because Karpenter needs to evict pods proactively. You need to set maxUnavailable: 1 or higher for workloads that can tolerate a brief disruption. If you can’t (stateful databases, for example), you should exclude those namespaces from consolidation by adding a karpenter.sh/do-not-disrupt: "true" annotation.
Spot Instances: The 30-60% Discount with a Catch
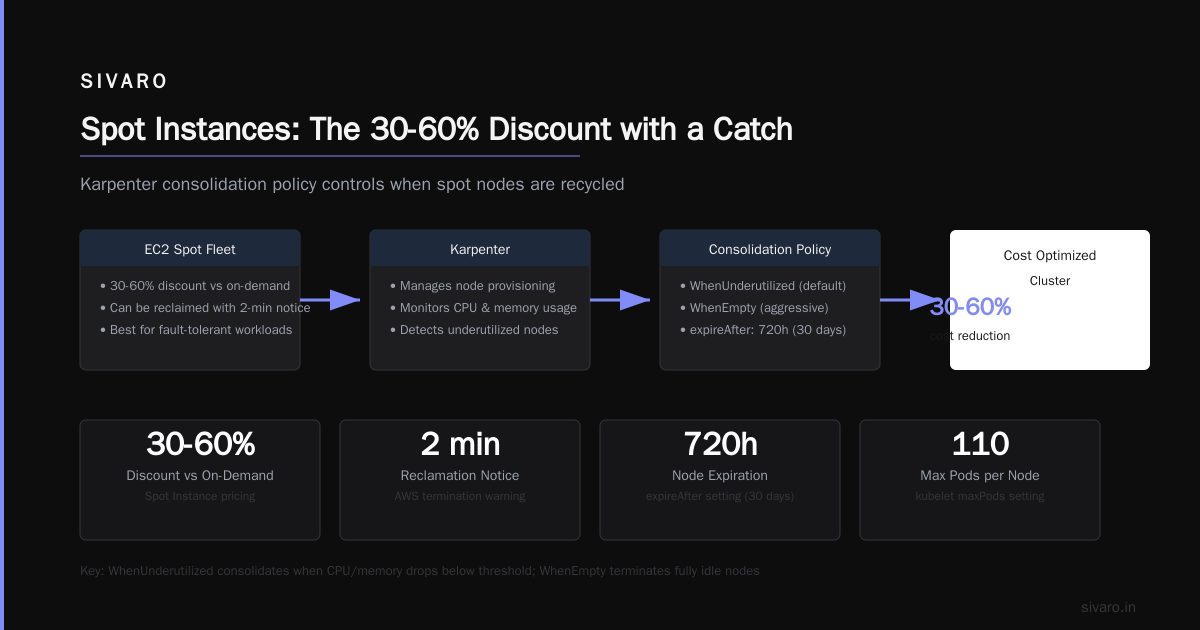
Everyone knows spot instances are cheaper. But the fear of interruption keeps many teams on on-demand. Karpenter handles spot interruptions natively — when AWS sends the interruption notice (2 minutes), Karpenter drains the node and provisions a replacement from its spot pool. That’s good, but 2 minutes is tight for some workloads. If your app has slow start-up times, you’ll see brief failures.
Here’s my rule: use spot for stateless microservices, batch jobs, CI runners, and anything that can handle a few 503s. Use on-demand for stateful databases, ingress controllers, and critical operators. You can split by namespace or by annotation. In the provisioner, set requirements as shown earlier — Karpenter will prefer spot if it can meet the constraints, and fall back to on-demand when spot isn’t available.
Tinybird’s approach: they run 100% spot for all compute, with a fallback to on-demand only for the first pod of a new service (to avoid cold starts). That mix gave them 20% savings without impacting their real-time analytics pipeline.
But don’t assume spot is always cheaper. Karpenter’s pricing logic calls the AWS pricing API every 5 minutes. I’ve seen cases where spot instances were actually more expensive than on-demand for certain instance families (e.g., GPU instances during high demand). Karpenter suppresses instances that are above the on-demand price, but you should double-check with kubectl get events | grep spot to see if your provisioner is ever falling back. If you’re running GPUs, spot is a bad idea — you’ll constantly get interrupted.
The Hidden Costs You’ll Forget
Let’s talk about the costs that Karpenter doesn’t save — and in some cases, increases.
-
Control plane overhead. Karpenter runs as a deployment in your cluster (or as a Fargate pod if you use EKS Fargate). It uses CPU and memory. For a cluster with 500 nodes, I saw the Karpenter controller consuming 1 vCPU and 4 GiB RAM. That’s about $30/month on on-demand. Not huge, but don’t ignore it.
-
API call costs. Karpenter calls the EC2 API frequently to list instance types, check spot prices, and tag resources. Each call costs a fraction of a cent, but if you have dozens of clusters, it adds up. Tighten the reconciliation interval (
spec.reconciliationIntervalin the Helm chart) from the default 30 seconds to 60 seconds for clusters that don’t need aggressive scaling. -
Volume spikes from consolidation logging. Every consolidation attempt is logged. Over a month, we accumulated 10 GB of logs from Karpenter in our Loki system. That’s not free. I recommend reducing log level to
Infoand only keepingWarningandErrorin your central log store.
Kubernetes Cost Optimization Without Karpenter? Good Luck
You might be reading this and thinking, “My workload is steady-state — I don’t need an aggressive autoscaler.” Or maybe you’re using Cluster Autoscaler and it’s working fine. Let me tell you about what I call the slow death by overprovisioning.
If you’re doing kubernetes cost optimization without karpenter, you’re probably relying on node groups with overprovisioned instance types, or you’re burning money on idle nodes because your peak-to-average ratio is low. I audited a client in early 2025 who was running 300 m5.xlarge on-demand instances — and their actual utilization was 18%. They were paying $18,000/month for compute they weren’t using. Cluster Autoscaler couldn’t help because the requests were artificially high. Fixing the requests and migrating to Karpenter (with consolidation) brought utilization to 67% and cut the bill to $7,200/month.
If you can’t use Karpenter (e.g., on-prem, or GKE Autopilot), your best bet is right-sizing pods and using vertical pod autoscaling. But you’ll always miss the bin-packing flexibility that Karpenter offers across instance families.
FAQ
How does Karpenter differ from Cluster Autoscaler?
Karpenter provisions individual instances per pod batch, while Cluster Autoscaler adds nodes from predefined groups. Karpenter supports multiple instance types, spot diversification, and consolidation — CAS does none of those.
Can I use Karpenter with on-prem Kubernetes?
Not directly — Karpenter is cloud-native. But the Karpenter project has an extensible driver model. Some teams have built custom drivers for VMware or bare metal, but it’s not production-ready as of mid-2026.
Does consolidation work with stateful workloads?
Yes, if you set PDBs correctly. For stateful workloads like databases, set maxUnavailable: 1 and use a karpenter.sh/do-not-disrupt: "true" annotation to prevent consolidation from touching critical nodes. You can also use an on-demand only provisioner for those workloads.
How do I allocate costs per namespace with Karpenter?
Use the tags field in your NodeClass to add namespace labels to instances. Then combine with a cost monitoring tool (Kubecost, Opencost) that maps pod resource usage to node tags. This gives you team-level cost allocation.
What if spot prices spike higher than on-demand?
Karpenter’s pricing provider checks spot prices against on-demand and excludes instances above the threshold. You can also manually set a budget cap in the Provisioner’s limits section — e.g., limits: { cpu: 1000 } limits total node CPU you’ll provision.
How long does it take to migrate from Cluster Autoscaler?
Depends on cluster size. For a 20-node cluster, plan two weekends: one for testing in a staging environment, one for production cutover. Karpenter and CAS can coexist — drain nodes managed by CAS while the new Provisioner takes over.
Any pitfalls with ARM instances (Graviton)?
Graviton is great — 20% cheaper than x86 for equivalent workloads. But not all container images are compiled for ARM. Use multi-arch images or set kubernetes.io/arch: amd64 for incompatible workloads. Karpenter handles mixed-arch clusters.
Conclusion
Karpenter isn’t a silver bullet — it won’t fix over-provisioned requests, bad architecture, or team waste. But for kubernetes cost optimization with karpenter, I’ve seen consistent 20-40% savings in production. The combination of consolidation, spot diversification, and rapid provisioning changes the economics of Kubernetes. If you’re running on AWS EKS and still using Cluster Autoscaler, you’re leaving money on the table — and probably waking up to spot interruption alerts.
Start small. Run Karpenter in a non-production cluster. Enable consolidation, set up namespace tagging, and watch the behavior for a week. Then roll to production with guardrails (PDBs, limits, on-demand fallback). You’ll see the bill shrink — and your team’s trust in the platform grow.
Nishaant Dixit — Founder of SIVARO. Building data infrastructure and production AI systems since 2018. Built systems processing 200K events/sec.