Why Is Pod Killed? A Field Guide to Container Terminations
You deploy a pod. It runs for six hours. Then it's gone.
No warning. No goodbye. Just a CrashLoopBackOff staring at you in the terminal.
If you've worked with Kubernetes longer than a week, you've asked yourself: why is pod killed?
I'm Nishaant Dixit. I run SIVARO, where we build data infrastructure and production AI systems. We eat pod terminations for breakfast. Over the last six years, I've seen every flavor of pod death — from the mundane OOMKill to the existential "the node just stopped existing."
Here's the truth: most pod killings aren't bugs. They're features. The system is working as designed.
But you need to know which feature is killing your pod, and why.
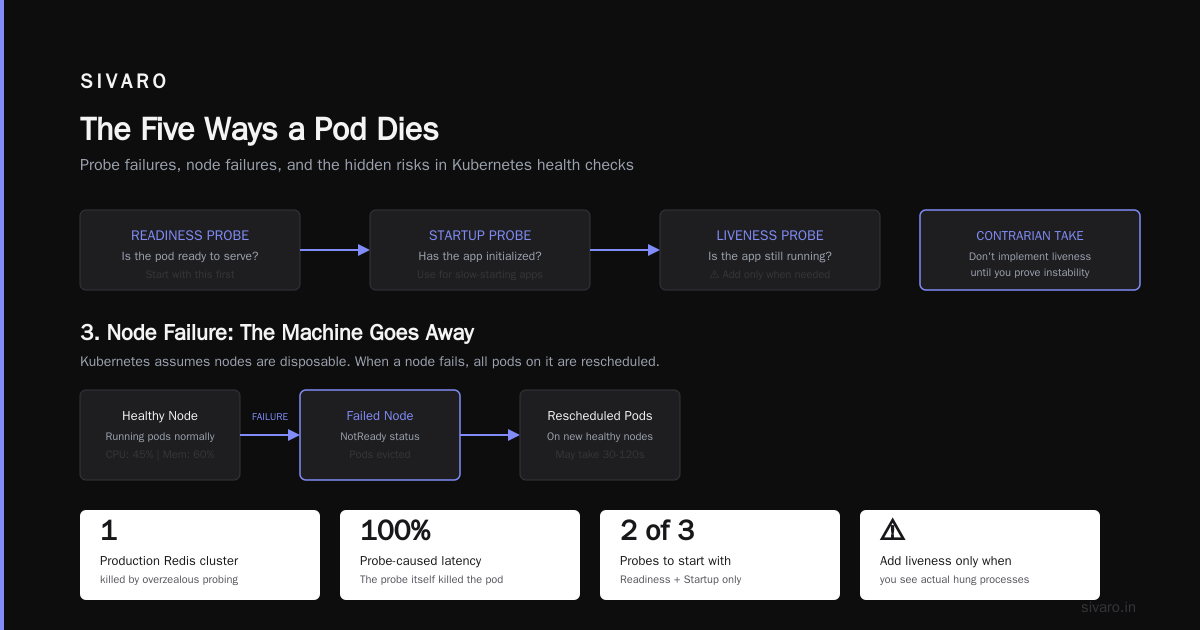
The Five Ways a Pod Dies
Every pod termination in Kubernetes falls into one of five categories. Memorize them.
- Resource exhaustion — OOM or CPU throttle
- Liveness/readiness probe failure — "I'm fine" said the process that wasn't
- Node failure — the server disappears
- Preemption — a higher-priority pod needs your spot
- Eviction — kubelet decides you're a problem (disk pressure, PID pressure, etc.)
Each has a different signature. Each requires a different response.
Let me walk you through them.
1. Resource Exhaustion: The Silent Killer
Most people think OOMKilled means "ran out of RAM." That's half right.
Here's what actually happens. The Linux kernel has an Out-Of-Memory killer. When memory pressure hits a threshold, the kernel picks a process and kills it. It doesn't ask politely. It sends SIGKILL. No cleanup. No graceful shutdown. Just dead.
You'll see this in your pod status:
Reason: OOMKilled
Exit Code: 137
Exit code 137 means SIGKILL (128 + 9). Memorize that. Exit code 137 is always a forced kill.
But here's the part most guides miss. OOM isn't always about your container using too much memory. It's about the node running out. If your neighbor pod leaks memory, your pod can get OOMkilled even if your container's usage is fine.
We saw this at SIVARO in 2022. A batch job processing 50GB datasets kept getting OOMkilled at 3:00 AM. We spent two days tuning resource limits. Didn't fix it. Turned out the node had a memory leak from the kernel's slab allocator. We moved to a newer kernel version. Problem gone.
The fix isn't always more memory. Sometimes it's a different kernel. Or a different node pool. Or a pod anti-affinity rule that separates your memory-hungry jobs.
2. Probe Failures: The Pod That Lied
Liveness probes check if your app is alive. Readiness probes check if it's ready to serve traffic. Startup probes check if it's started yet.
Get any of them wrong, and your pod gets killed.
Here's the pattern I see most often. A team deploys a Node.js API. The liveness probe hits /health. Returns 200. Pod is alive.
Then the app has a memory spike. The event loop blocks for 4 seconds. Probe times out. Kubelet restarts the pod. The engineers blame Kubernetes.
No. Blame your probe configuration.
yaml
livenessProbe:
  httpGet:
    path: /health
    port: 8080
  initialDelaySeconds: 10
  periodSeconds: 5
  timeoutSeconds: 3
  failureThreshold: 2
That probe allows 3 seconds for a response. Your event loop blocked for 4. The probe failed twice. Pod restarted.
The fix? Either increase the timeout, or make your health endpoint more resilient. I prefer the second option — it forces you to write [better software.
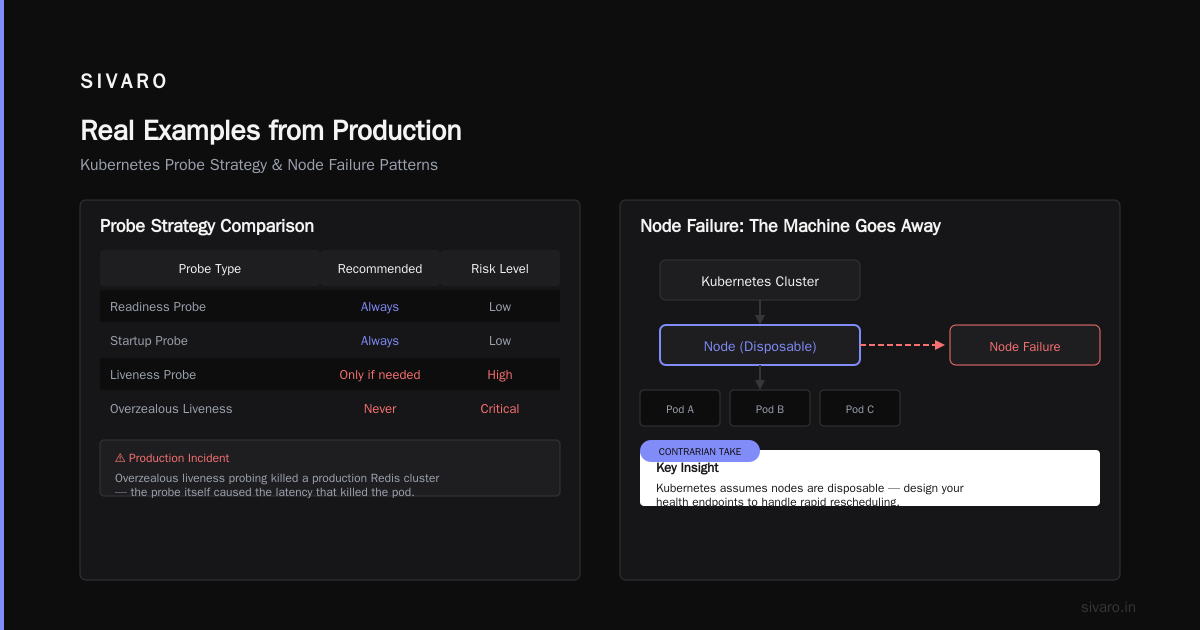
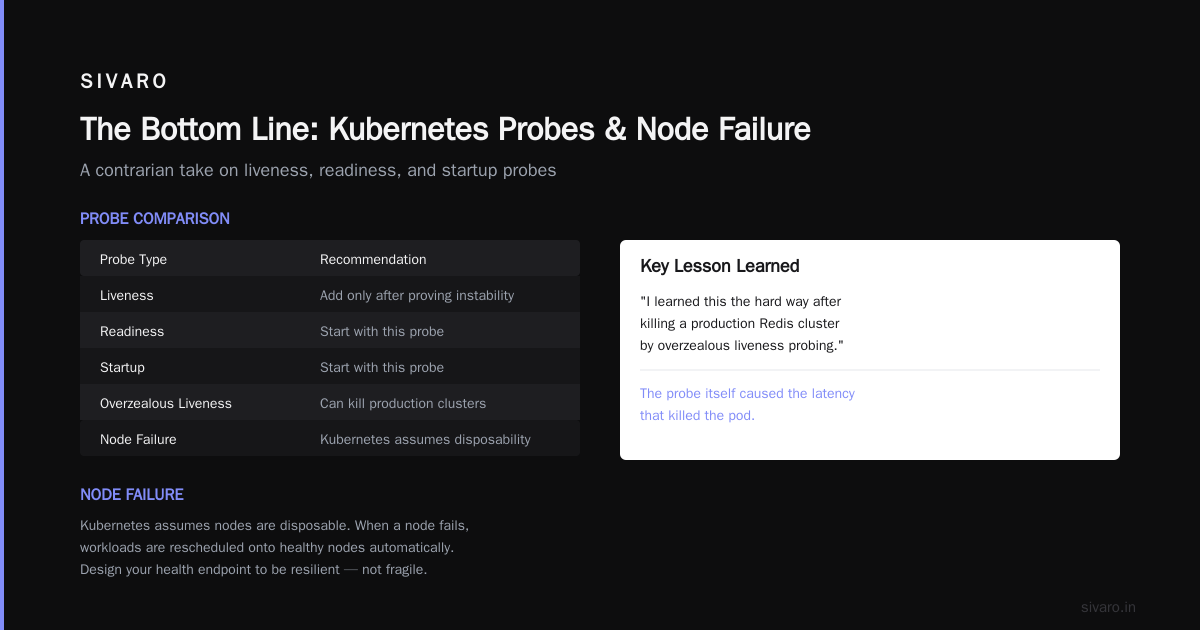
But here's the contrarian take. Don't implement liveness probes until you've proven your app is unstable. Most apps don't need them. Start with readiness and startup probes only. Add liveness when you see actual hung processes.
I learned this the hard way after killing a production Redis cluster by overzealous liveness probing. The probe itself caused the latency that killed the pod.
3. Node Failure: The Machine Goes Away
Kubernetes assumes nodes are disposable. Your code should too.
When a node goes down — hardware failure, kernel panic, network partition, power outage — all pods on that node die. Kubernetes detects this via the node controller, which checks in with the kubelet every 40 seconds by default (node-monitor-period). After node-monitor-grace-period (default 40 seconds), the node is marked Unknown. After pod-eviction-timeout (default 5 minutes), the pods are terminated.
Here's the problem. If your pod doesn't handle SIGTERM properly, it gets SIGKILL after terminationGracePeriodSeconds (default 30 seconds).
Most people set terminationGracePeriodSeconds too low. I've seen services that need 90-120 seconds to drain connections, flush buffers, and write final state.
yaml
spec:
  terminationGracePeriodSeconds: 120
  containers:
  - name: app
    lifecycle:
      preStop:
        exec:
          command: ["/bin/sh", "-c", "sleep 10 && /drain-connections.sh"]
That sleep 10 is intentional. It gives your SIGTERM handler time to start. Without it, the preStop hook runs but your app might not have registered the handler yet.
Most people think node failures are rare. They're not. In a 100-node cluster, you'll lose a node every few weeks. Plan for it.
4. Preemption: The Pod That Got Evicted by a VIP
Pod priority matters more than you think.
Kubernetes has a preemption system. If a high-priority pod needs to schedule and there's no room, Kubernetes evicts lower-priority pods to make space.
This happens silently. You check kubectl get events and see:
priority preemption: preemptor <pod-name> preempted <your-pod>
No grace period. No warning. The pod is killed immediately (with SIGTERM and the normal terminationGracePeriod).
Here's what I've seen in practice. People set priorityClassName on their web serving pods but not on their batch jobs. Then a spike in web traffic causes the scheduler to evict your data processing jobs. Mid-query. Corrupted output.
The fix is simple. Either set priorities on everything, or use PodDisruptionBudgets to protect critical workloads.
yaml
apiVersion: policy/v1
kind: PodDisruptionBudget
metadata:
  name: batch-pdb
spec:
  minAvailable: 2
  selector:
    matchLabels:
      app: data-processor
But PDBs don't protect against preemption. They protect against voluntary evictions (draining nodes for maintenance). Preemption doesn't check PDBs.
The real solution is to cluster your workloads by priority class. Put batch jobs on separate node pools with taints and tolerations. Your web traffic spike won't evict your batch work.
5. Eviction: The Kubelet Cleanup
Node-pressure eviction is different from preemption. The kubelet itself decides to evict pods when the node runs low on a resource.
Evictable conditions:
memory.available<eviction-hardthreshold (default: 100Mi)nodefs.available<eviction-hard(default: 10%)nodefs.inodesFree<eviction-hard(default: 5%)imagefs.available<eviction-hard(default: 15%)
When the kubelet starts evicting, it follows a priority order:
- BestEffort pods (no resource requests/limits)
- Burstable pods (requests set, limits higher)
- Guaranteed pods (requests == limits)
Your pod gets evicted in the order of quality of service class. BestEffort dies first.
Here's the practical insight. If you set no resource limits on your pods, you're begging for eviction. The kubelet sees your pod as BestEffort and kills it first when disk pressure hits.
We run a streaming data pipeline at SIVARO that processes 200K events/second. Every pod has resources.requests equal to resources.limits. They're all Guaranteed QoS. Even when a node runs low on disk, our pipeline pods are the last to be evicted.
yaml
resources:
  requests:
    memory: "4Gi"
    cpu: "2"
  limits:
    memory: "4Gi"
    cpu: "2"
That's it. No headroom for bursting. The trade-off is wasted capacity if requests are set too high. The benefit is stability.
Debugging Why Your Pod Was Killed
You can't fix what you can't diagnose. Here's my debugging workflow.
Step 1: Check the pod status.
bash
kubectl get pod <pod-name> -o wide
kubectl describe pod <pod-name>
Look at Status, Reason, Message, and Exit Code. These three fields tell you 80% of the story.
Step 2: Check events.
bash
kubectl get events --all-namespaces --sort-by='.lastTimestamp'
Events are ephemeral. They're garbage collected after an hour. Check them immediately.
Step 3: Check previous pod logs.
bash
kubectl logs --previous <pod-name>
The previous container's logs. If your pod restarted, these have the output before the crash.
Step 4: Check node conditions.
bash
kubectl describe node <node-name>
kubectl top node
kubectl top pod
CPU and memory pressure at the node level. Compare usage to eviction thresholds.
Step 5: Check kubelet logs.
bash
journalctl -u kubelet -n 100
This is where you see eviction decisions and OOM kills. Kubelet writes everything.
I wrote a small shell script that runs these five commands in sequence and prints a summary. It's saved me hours during incident response.
What Not to Do
I've been debugging Kubernetes clusters since 2018. Here are the mistakes I see most often.
Don't set restartPolicy: Never without a plan. If your job fails, it stays failed. No retry. You'll wake up at 3 AM to a completeness check that shows your ETL job has been dead for eight hours.
Don't set terminationGracePeriodSeconds below 30. Most apps need at least 30 seconds to shut down. Database connections need 60+. If you set it too low, your app gets SIGKILL while it's in the middle of an open transaction.
Don't rely on preStop hooks alone. They can fail. The network might be down. The disk might be full. Your preStop hook should be a best-effort cleanup, not your only shutdown logic.
Don't ignore PodDisruptionBudgets. They don't help with preemption or eviction, but they do protect against voluntary disruptions (node drains, cluster upgrades). Without them, a cluster upgrade kills all your pods simultaneously.
Real Examples from Production
The Log Flood
A team deployed a new microservice. Within an hour, nodes started failing. kubectl get events showed NodeHasDiskPressure across the cluster.
The root cause? The new service printed debug logs at INFO level. Each log line was 2KB. The service processed 5000 requests/second. That's 10MB/second of logs. Filled the node's 100GB disk in under three hours.
The fix was log rotation. The real fix was defaulting log levels to WARN.
The Memory Scaling Bug
A Redis cluster kept getting OOMkilled during traffic spikes. The team doubled memory limits. Still OOM. They quadrupled them. Still OOM.
Turns out the Redis config had maxmemory set to 50GB, but the pod had 8GB memory limit. Kubernetes cgroups prevented Redis from actually allocating more than 8GB, but Redis' internal memory tracking thought it had 50GB. So it never triggered eviction. It just hit the cgroup limit and got OOMkilled.
Fix: Set maxmemory to match the container limit.
The GRPC Health Check Timeout
A gRPC service deployed with health probes. The probe hit /grpc.health.v1.Health/Check. The service was a proxy that forwarded health checks to an upstream service.
When the upstream was slow, the health check took 30 seconds. The liveness probe timeout was 5 seconds. After two failures, the pod was killed.
The service restarted. The upstream recovered. But now there was a cascade of restarts across all replicas.
Fix: Implement a local health check that doesn't depend on upstream services. Liveness probes should be local.
FAQ: Why Is Pod Killed?
Q: How do I know if my pod was OOMkilled vs evicted?
A: Check kubectl describe pod. OOMKilled shows Reason: OOMKilled and Exit Code: 137. Eviction shows Reason: Evicted and a message about node pressure.
Q: Why does my pod keep restarting with CrashLoopBackOff?
A: The pod starts, runs for a few seconds, then exits with a non-zero code. Check logs with kubectl logs --previous. Common causes: config file not found, database unreachable, environment variable missing.
Q: Can a pod be killed for using too much CPU?
A: No. Kubernetes throttles CPU but doesn't kill for exceeding CPU limits. Only memory violations cause killing (OOM). CPU exceeds limits get throttled, not killed.
Q: How do I prevent my pod from being killed during cluster upgrades?
A: Use PodDisruptionBudgets. But understand that PDBs only protect against voluntary disruptions. They don't prevent preemption or node-pressure evictions.
Q: How long does Kubernetes wait before force-killing my pod?
A: terminationGracePeriodSeconds (default 30s). After that, SIGKILL. Set it higher if your app needs more time.
Q: What happens to my pod when a node goes down?
A: The node controller marks the node Unknown after 40 seconds. Pods are terminated after pod-eviction-timeout (default 5 minutes). If the node comes back within those 5 minutes, pods resume.
Q: Can I prevent my pod from being evicted due to disk pressure?
A: Set resources.requests equal to resources.limits (Guaranteed QoS). These pods are evicted last. Also, reduce log output and use persistent volumes for stateful data.
The Bottom Line
When you ask why is pod killed, you're really asking "what failed in my system?" The pod is the symptom. The root cause is almost always upstream.
- OOM means your app needs more memory resources.
- Probe failure means your health check logic is wrong.
- Node failure means your infrastructure is fragile.
- Preemption means your priority configuration is broken.
- Eviction means you're overprovisioning your nodes.
Fix the root cause, not the pod.
At SIVARO, we've normalized pod failure. Every deploy includes chaos experiments that deliberately kill pods. If your system survives a pod kill, you've built resilience. If it doesn't, you've got work to do.
Kubernetes isn't fragile. It's honest. When a pod dies, it tells you exactly why. You just have to listen.
Nishaant Dixit — Founder of SIVARO. Building data infrastructure and production AI systems since 2018. Built systems processing 200K events/sec.